Processing
Types of operations
The operations to be performed with the data can be:
- Arithmetic: classic operations of addition, subtraction, multiplication and division or maths operations.
- Logics: comparisons, negation, AND, OR.
- Concatenation: union of several elements (strings of characters or variables of different types)
- Loops: Involves performing actions repeatedly. In this case it will be convenient to distinguish two types:
- Previously known number of times to repeat the action: we will use the For or Repeat structures.
- Number of times to repeat depending on values obtained: we will use the structures While (While...do) or Repeat until (Do...while), depending on whether we want to evaluate the condition before or after the first iteration. We will see that these structures are conditional as well as repetitive.
- Conditional: implies carrying out some actions or others by making decisions. Structures If-then (If-else), and Switch.
We have already seen the first three types of operations in the previous examples. We will now focus on the last two, although we will introduce various operations in the examples to delve into their use.
Iterations and loops
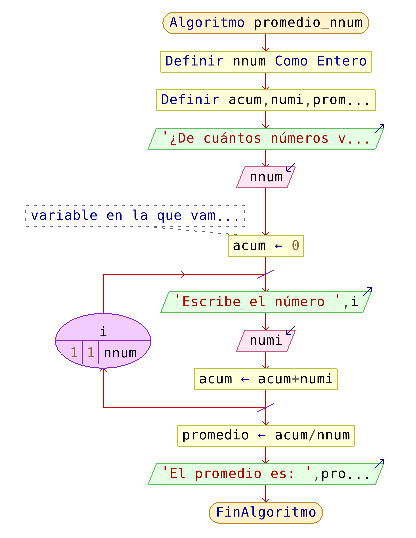
To practice with these structures, we will create a simple program that will calculate the average of several numbers (marks, for example). First, the program requests the number of marks to average, then it asks that the marks be entered as many times as we have told it (here is the repetition). At the end, it shows the average. In this case, since the number of iterations is known, we will use the FOR statement. Likewise, we will use arithmetic and concatenation operators.
Steps 1 and 2: Analysis and flow chart of the Average of n marks program
The elements involved are:
- Start and end of algorithm.
- Outputs: Request number of marks, show average.
- Inputs: number of marks and marks to be averaged.
- Storage: number of elements (integer), entered numbers (real number), cumulative sum of numbers (real number), and average (real number)
- Processing: loop, addition and division.
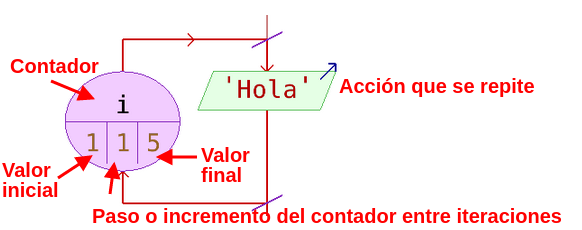
The flowchart associated with the FOR instruction is as follows:
Flowchart:
Steps 3, 4 y 5: Coding, compilation and checking of the Average of n marks program with PSeInt
As we saw in the previous section, after renaming the algorithm, we begin by defining the variables involved by writing the expression Definir
PSeInt allows you to define several variables of the same type on the same line, separated with commas. As you can see, we have defined a single numi variable where we will save the number entered by the user each time.
Next we request the number of numbers to average (Escribir), we read the response and store it in the corresponding variable (leer) and we initialize the value of accum to 0, although actually it would not be necessary since it is the value assigned by default.
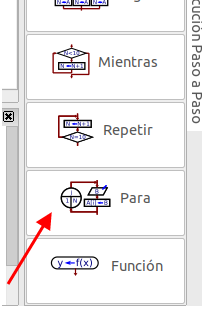
With the value of nnum defined by the user comes the time for repetition: we will ask the user to enter a number nnum times. To do this we will use the For (Para) command available in the window on the right.
When we click on the command, the following instructions are written:
As variable numérica a local variable (i, j, k...) is usually defined, which acts as a counter. The initial value is 1 and the final value is the number of times we want to repeat the instruction. The step (Paso) specifies the growth of the counter from one iteration to another (in our case one by one)
Finally, in the secuencia de acciones we have to put what we want to be repeated each time. In our case, request the number, read it and add it to the previous ones, saving the result in the accum variable.
The value of numi is refreshed and varies in each iteration, since we have already saved the value of the previous number in the accumulated one.
In a program it is very important to use the minimum number of necessary variables so as not to add unnecessary complexity to it. (KISS Principle of Software Design)
We have concatenated the numeric counter variable in the request message. This allows us to show the user what iteration they are on. The Escribir instruction followed by the elements to be concatenated separated by commas places them on the same line and without separation between them. That is why it is necessary to consider the separation spaces in the character strings that we include.
Finally, we assign the average value to the corresponding calculation and display the result again by concatenating two messages.
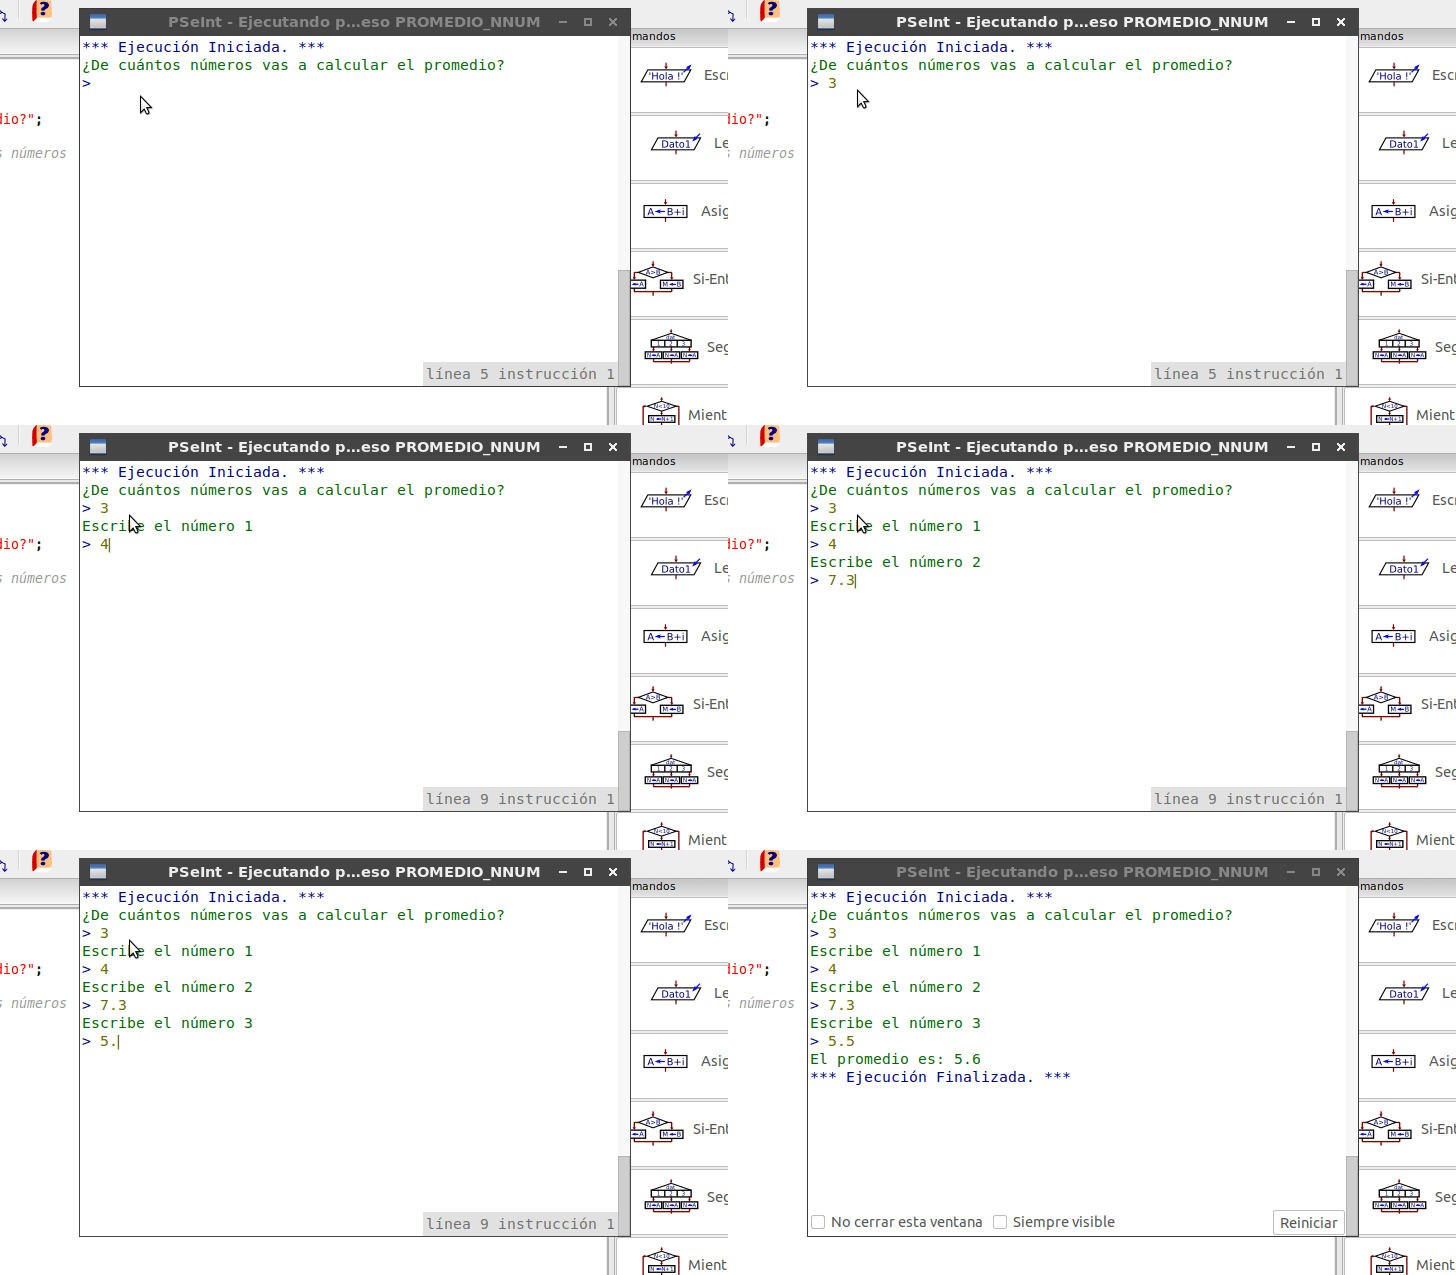
 Finally we click Ejecutar and verify the process carried out.
Again in the verification of the program we can experience the robustness of the program against errors, introducing decimal numbers with commas, negatives, etc... We invite you to do it and enter the necessary instructions to prevent errors.
Pasos 3, 4 y 5: Codificación, compilación y verificación del programa Promedio de n números con Scratch
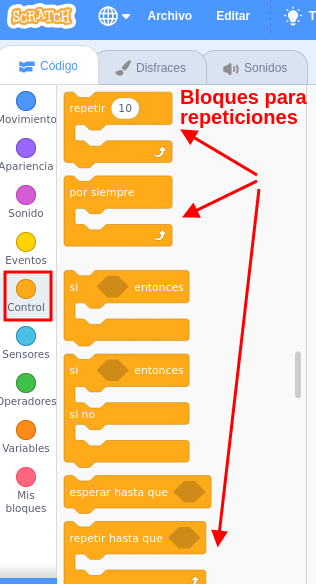
En Scratch los bloques relacionados con las estructuras repetitivas se encuentran en Control y son Por siempre, Repetir y Repetir hasta que.
En nuestro caso, como el número estará definido, usaremos Repetir.
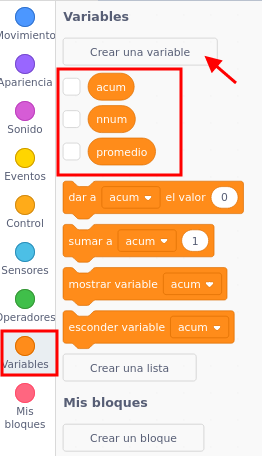
En primer lugar en el bloque Variables definiremos las variables necesarias.
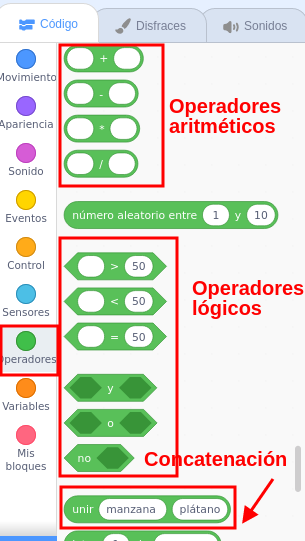
De forma análoga, utilizando los bloques de Sensores, Apariencia, Variables explicados en los apartados de Entradas, Salidas y Datos, construimos el programa. En Operadores encontraremos los bloques necesarios para la realización de las operaciones aritmético, lógicas y de concatenación.
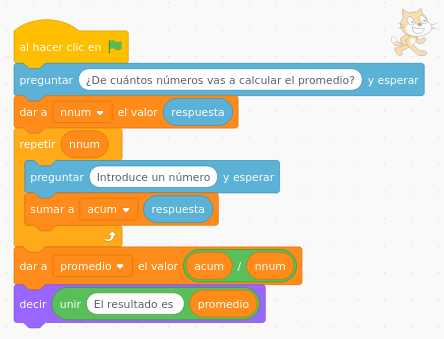
El programa finalmente con todos los elementos quedaría así:
Condicionales
Para practicar con estas estructuras, realizaremos un pequeño programa en el que tras solicitar una nota numérica, y verificar en primer lugar si el valor recibido es correcto, nos indicará si la nota corresponde a un APROBADO o un SUSPENSO.
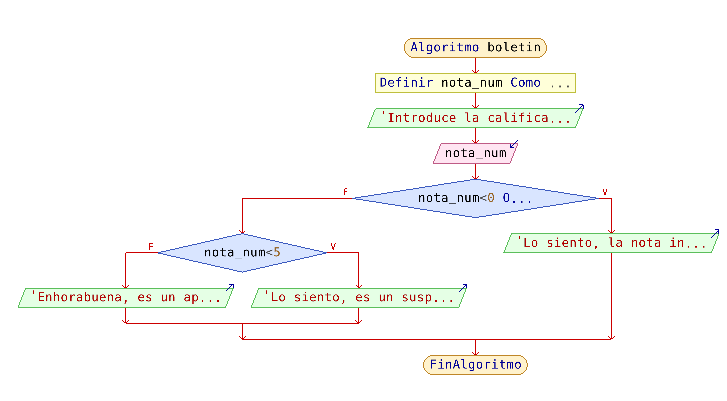
Pasos 1 y 2: Análisis y diagrama de flujo del programa Boletín
Los elementos implicados serán:
- Inicio y fin de algoritmo.
- Salidas: Solicitar calificación numérica, mostrar calificación textual o mensaje de error.
- Entradas: calificación numérica
- Almacenamiento: calificación numérica (número real, puede tener decimales)
- Procesamiento: lógicas (comparación,Y,O) y condicionales.
Diagrama de flujo:
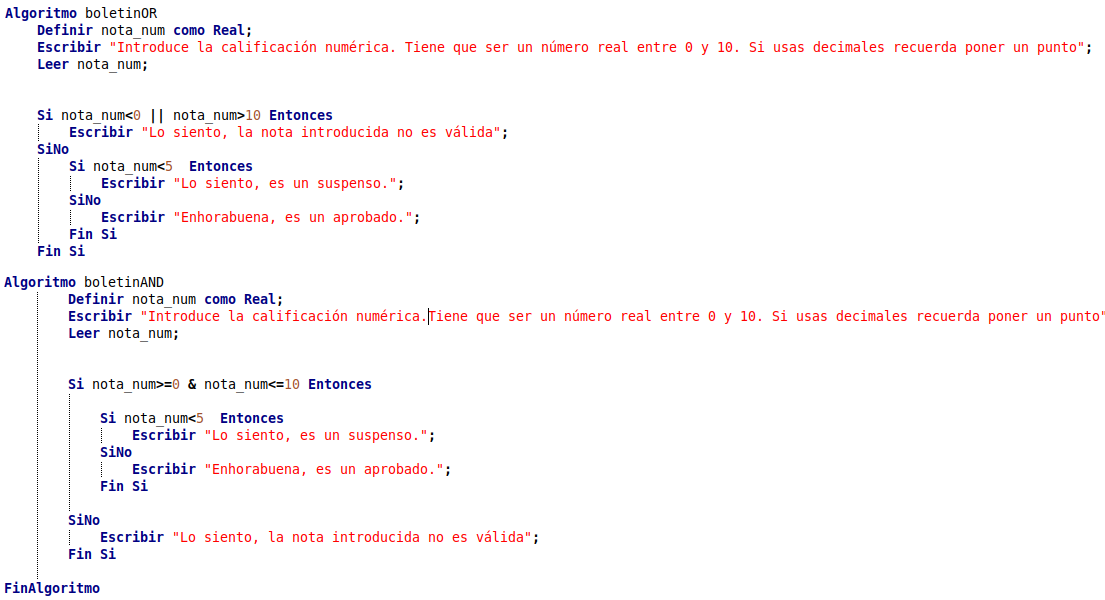
En este caso hemos definido la condición de error mediante el operador lógico O, indicando que se considere errónea cualquier calificación menor que cero o mayor que 10. Este programa puede ser resuelto de forma análoga utilizando el operador Y, indicando que considere válida cualquier nota numérica mayor o igual que cero y menor o igual que 10.
Pasos 3, 4 y 5: Codificación, compilación y verificación del programa Boletín con PSeInt
En primer lugar renombramos el algoritmo (boletin en nuestro caso) y definimos las variables implicadas que solo es la calificación numérica (nota_num)
A continuación solicitamos la calificación numérica (Escribir) y la introducimos en la variable definida (Leer)
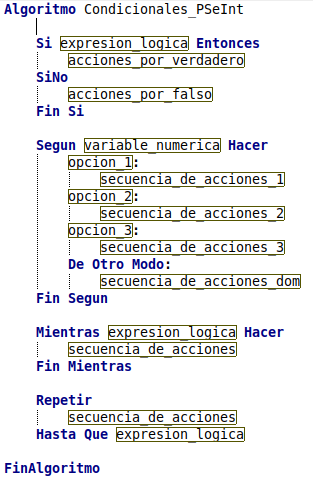
Ahora vendría la aplicación de la condición. Los comandos encargados en PSeInt de introducir las condiciones son Si-entonces, Según, Mientras y Repetir. Un ejemplo de la sintaxis de cada una se puede apreciar en la siguiente figura
- Si-entonces: verifica que se cumple una condición o no y en función de ello ejecuta unas acciones. Se pueden anidar unas condicionales dentro de otras.
- Según: se utiliza cuando una variable puede adoptar un número discreto de opciones (tipo menú) y se define el comportamiento ante ellas y ante el caso de que no coincida con ninguna.
- Mientras: evalúa una condición en bucle y mientras es verdadera ejecuta una acción. Mezcla condicional y bucle.
- Repetir-hasta que : ejecuta una acción en bucle hasta que una condición se cumple en cuyo momento se interrumpe. Mezcla condicional y bucle.
En nuestro ejemplo la condición solo se evalúa una vez por lo que descartamos las dos últimas, y el valor numérico introducido puede tener infinitos valores entre 0 y 10 por lo que la segunda tampoco es válida. Usaremos entonces el comando Si-entonces.
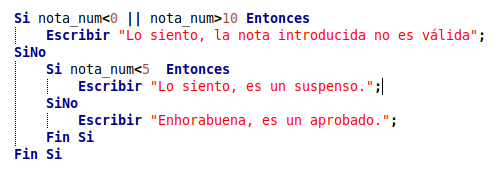
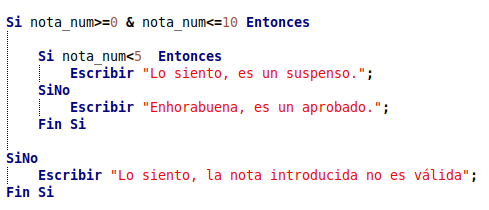
Vamos a aprovechar para introducir dos nuevos operadores, el operador Y representado por el carácter & y el operador O representado por la doble barra || que se utilizan cuando queremos que se evalúe más de una condición simultáneamente. En nuestro caso podemos considerar dos opciones:
- Si la nota introducida es menor que 0 o mayor que 10, no tiene sentido,y hay que dar un mensaje de error. En caso contrario habrá que distinguir (condicional anidada) si es menor que 5 y entonces el mensaje dicta suspenso, y si es mayor o igual que 5 que será aprobado.
- Si la nota introducida es mayor o igual que 0 y menor o igual que 10, es correcta y hay que distinguir (condicional anidada) si es menor que 5 o mayor. En caso contrario sacar el mensaje de error.
Las dos son correctas y elegir una u otra solo dependerá de la persona programadora y si prefiere usar operadores Y u O.
Finalmente sólo nos quedaría Ejecutar el programa y verificar su correcto funcionamiento.
Dejamos como ejercicio de ampliación el reformular este programa para que siga preguntando hasta que reciba una calificación válida. Como pista sugerimos explorar las posibilidades de la instrucción Repetir.
Pasos 3, 4 y 5: Codificación, compilación y verificación del programa Boletín con Scratch
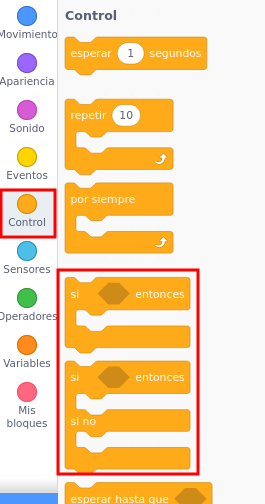
En Scratch los bloques relacionados con las estructuras condicionales se encuentran en Control, junto a los bucles.
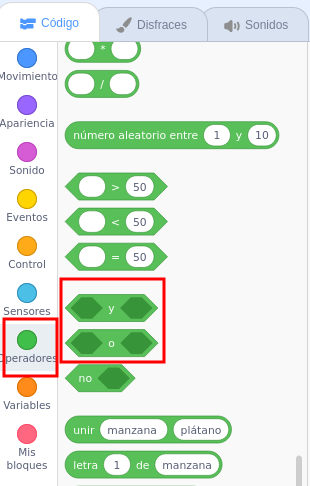
Los operadores lógicos Y y O se encuentran en Operadores, junto con los de comparación y los ya vistos anteriormente: aritméticos, de concatenación...
Como en todos los programas empezaremos definiendo las variables necesarias, en nuestro caso sólo una desde los bloques de Variables.
A continuación solicitaremos la calificación mediante el bloque disponible en Sensores y almacenaremos su respuesta en la variable recién creada.
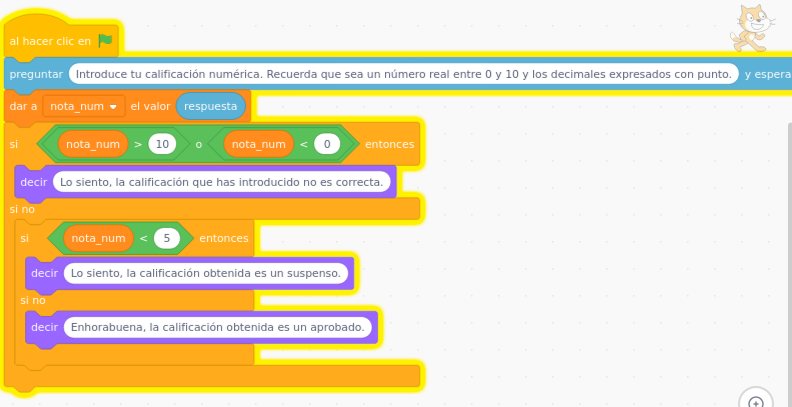
Por último evaluaremos la respuesta obtenida mediante el bloque correspondiente de Control y utilizando los operadores lógicos de Operadores, según sea su valor ofreceremos el mensaje de error o escribiremos la calificación final con el bloque correspondiente de Apariencia.
El código resultante sería el siguiente:
En este caso hemos utilizado el operador O porque Scratch no dispone de los operadores combinados menor o igual y mayor o igual, y así nos ahorramos el tener que combinar ambos operadores con un operador lógico O. Recordad el principio KISS.
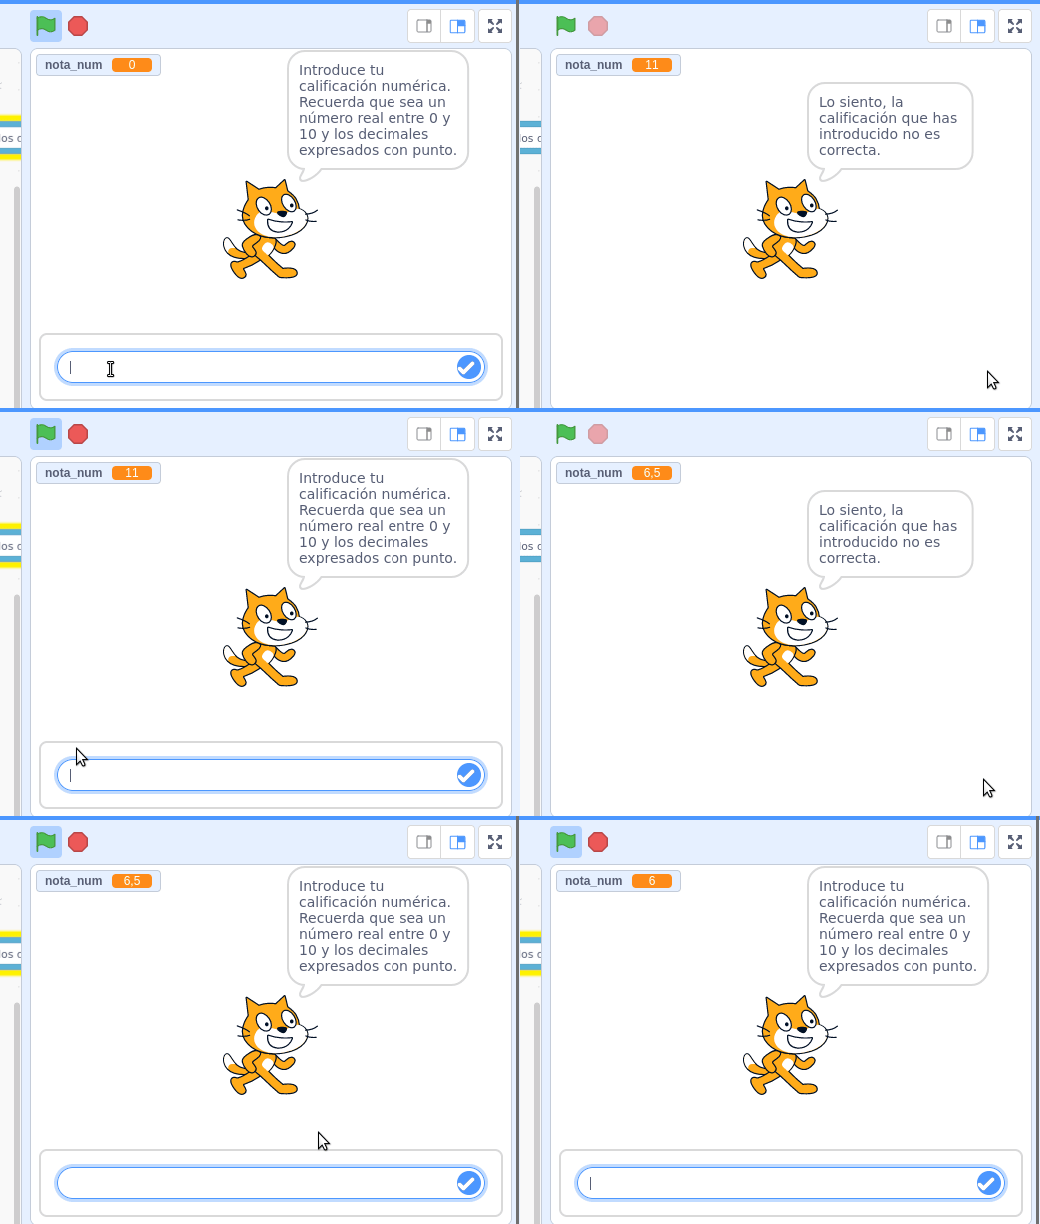
Por último, verificamos el correcto funcionamiento del programa y su robustez frente a los errores más comunes. En Scratch ejecutamos haciendo clic sobre la bandera verde.
Pruébalo aquí !!

