Programming
This book is an adapted work from
- https://libros.catedu.es/books/fundamentos-de-programacion-estructurada-con-pseint-y-scratch
- https://libros.catedu.es/books/ensena-pensamiento-computacional-con-scratch
Translated and adapted by Ana Mª López Floría (2023)
- Introduction
- First steps with Scratch
- Starting to use Scratch
- Blocks
- Sprites, costumes and stages
- Programs and motion
- Sound, Music and Pen
- Control: loops
- Control: conditions and sensors
- Messages
- Variables
- Your first game
- Basic elements in programming
Introduction
What is programming?
Programming is providing the necessary instructions to a machine or device so that it can work automatically.
In every program there are a series of elements that will always be present:
- Input: data or information that must be provided to the machine so that it can perform the desired operations.
- Ouput: information or result that the machine shows.
- Storage: The data, while being processed by the machine, needs to be stored in some way to work with it. Here we will talk about variables, vectors, matrix or other complex data storage structures, although in this course we will limit ourselves to working with variables.
- Processing: operations to which the data is subjected to obtain the desired results. They can be arithmetic, logic, loops, conditionals, etc...
The development of a program consists of the following steps:
- Definition and analysis of the problem
- Algorithm design using flowcharts.
- Program coding: obtaining the source code using the chosen programming language.
- Compilation: conversion of source code to machine language.
- Bug debugging and program checking.
- Operation: documentation and maintenance. In this course, due to the simplicity of the programs created, we will not go into this step, although it is essential that every good program be accompanied by good documentation and a good update plan.
There are a series of principles when designing software that are common:
- KISS: acronym for Keep It Simple, Stupid! This principle tells us that any system will work better if it is kept simple than if it becomes complex. Simplicity has to be a goal in development and unnecessary complexity must be eliminated.
- DRY: acronym for Don't Repeat Yourself. This principle talks about the duplication of the code, first of all because of the previous principle, and also because subsequent maintenance becomes more difficult since we do not know where we have to modify things because they are repeated on various occasions throughout the program and the inconsistencies multiply.
For further information about these principles consult here.
Flowcharts
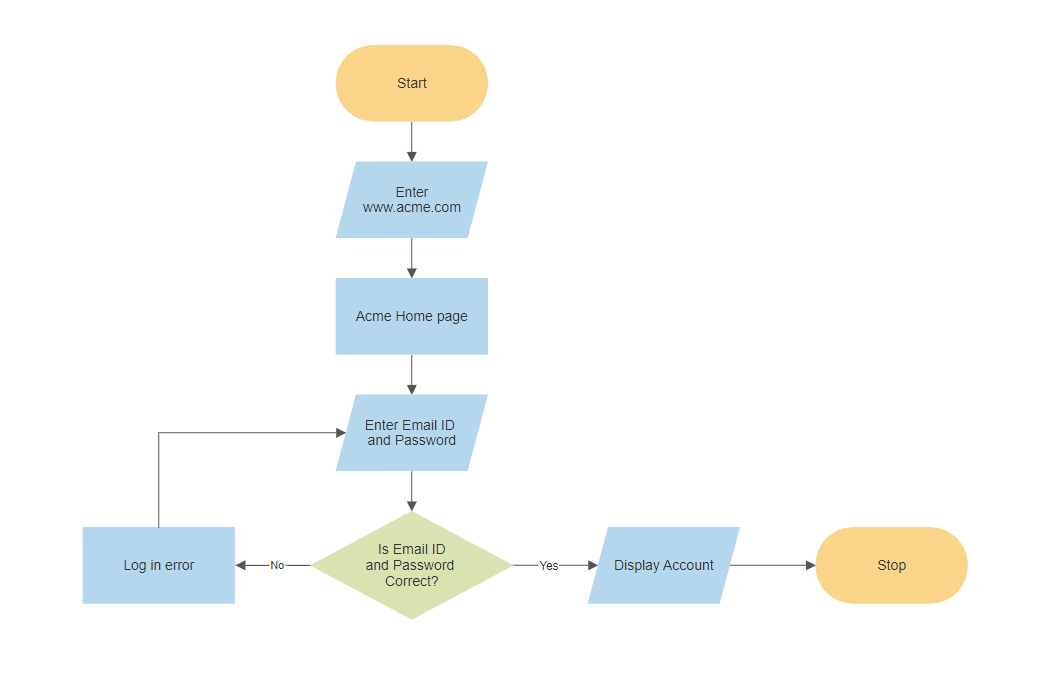
An algorithm is a sequence of steps that must be performed to solve a problem.
A flowchart is a way to represent a process or algorithm in a visual, structured and organized way. It is a very useful tool to organize and structure a programming task before jumping directly into the code.
Example of flowchart:
There are various computer programs for creating flowcharts. Most text processors or slideshow software allow it. However, it is advisable to create flowcharts first with paper and pen, and if appropriate in a collaborative way, and use the software to simply edit them finally to include as program documentation.
Elements of a flowchart
A flowchart is fundamentally made up of the following elements:
- Flowline: Shows the process order of operation. It is a line coming from one symbol and pointing at another
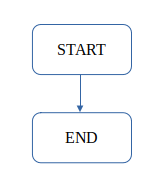
- Terminal: Indicates the beginning and ending of a program or sub-process. Represented as an oval or rounded rectangle. They usually contain the word "Start" or "End"
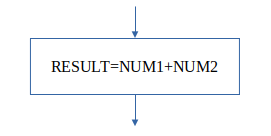
 Process: Represents a set of operations that changes value, form, or location of data. Represented as a rectangle.
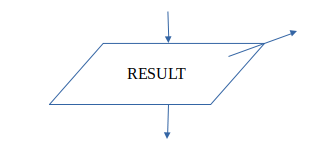
- Input data: Indicates the reception of data at the input. It is represented by a rhomboid and an inward arrow.
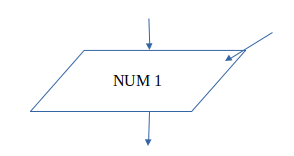
- Output data: Indicates printing data on output. It is represented by a rhomboid and an arrow pointing out.
- Decision: Shows a conditional operation that determines which one of the two paths the program will take. The operation is commonly a yes/no question or true/false test. Represented as a diamond.
- Other: Like some types of loops, we will see them later.
Simple examples of flowcharts
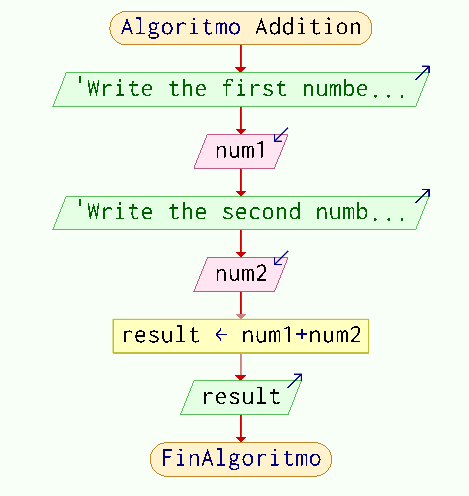
Example 1: Flowchart of a program that takes two numbers, adds them and shows the result on the screen
SOLUTION:
- Output: It must ask for the two numbers to add, and then show the result.
- Input: the two numbers to add
- Storage: two variables to store the two numbers (num1 y num2) , and a third one to store the result (result)
- Processing: Addition.
Flowchart
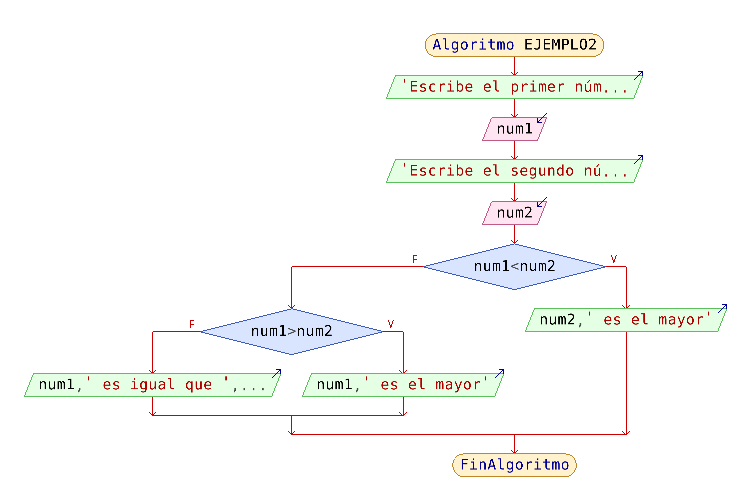
Example 2: Flowchart of a program that compares two numbers which is larger and displays it on the screen.
SOLUTION:
- Output: it must ask the two numbers to compare and then show the result of the comparison.
- Input: the two numbers to compare
- Storage: two variables to store the numbers to compare (num1 y num2)
- Processing: logic comparison.
Flowchart:
First steps with Scratch
Scratch
Scratch is both a programming language with a simple interface that allows young people to create digital stories, games and animations using block programming, and it is also the largest programming community for boys and girls in the world. Scratch is designed, developed and moderated by the Scratch Foundation, a non-profit organization, which offers it openly and free in more than 70 languages.
Scratch has been developed specifically for young people between 8 and 16 years old, although people of any age can participate in the project.
An online version of the tool is available on its website, accessible without the need for any type of registration.

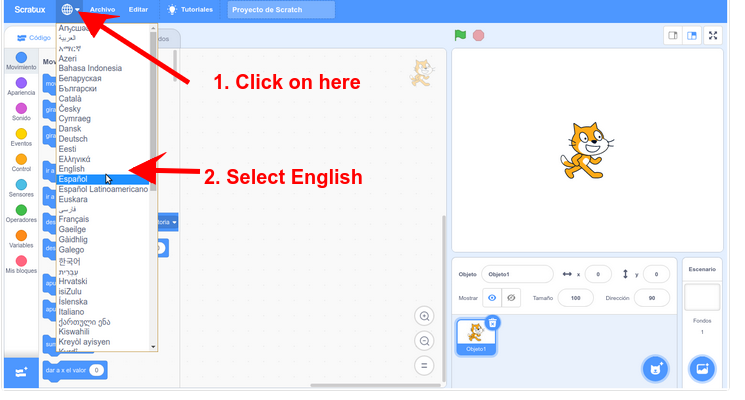
We will use the offline tool called SCRATUX . It will allow to save and load our projects without any type of registration.
To change the language to English look at the picture:
Scratch is multi-platform free software, thus guaranteeing its universal accessibility.
Interface
Scratch home screen
We will use the Offline version of Scratch 3.0 called Scratux, but the interface is similar in other versions.
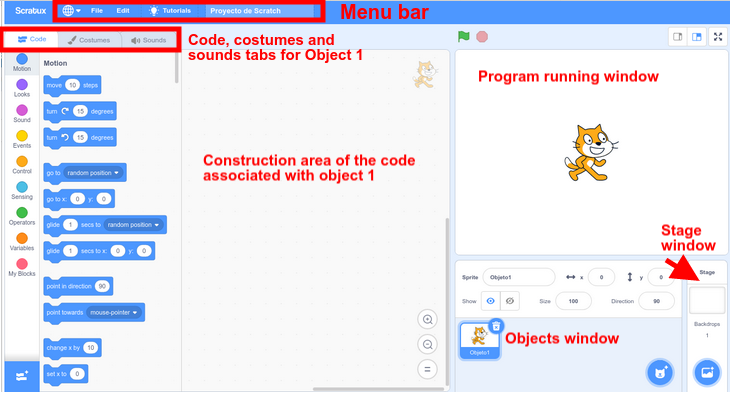
- Menu bar: at the top left, where we can choose the language, save or load our projects or access various tutorials.
- Code, costumes and sounds tabs: on the left, from where we can choose the code blocks to execute and choose and edit costumes and sounds associated with our different objects.
- Program running window: at the top right. There we will see the result of the program.
- Sprites and Stage windows: at the bottom right. There we will choose the different sprites that we want our program to include. A sprite would be an element of our program to which a behavior and therefore a code is associated. They can be characters, buttons, arrows, etc...Also the stages in which we want our objects to be placed, and which can also have associated code changing or sounding in one way or another as we program it.
Starting to use Scratch
Blocks
We are going to make our first program in Scratch:
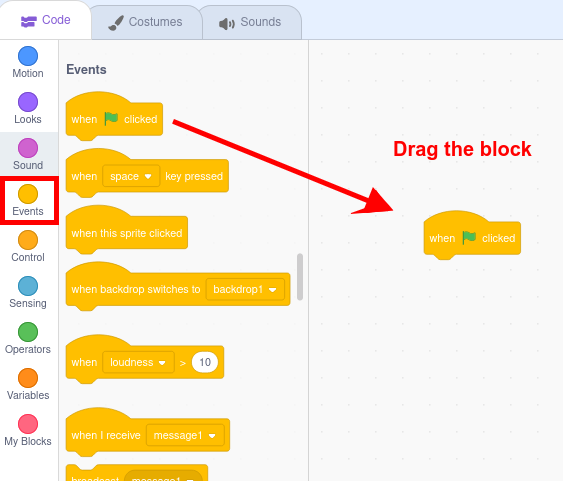
- Click on the Code tab, in the Events menu
- Drag the "When green flag clicked" block:
3. Click on Motion now.
4. Drag the block "move 10 steps" to the right area and place it by dragging it just below the "When flag clicked" block:
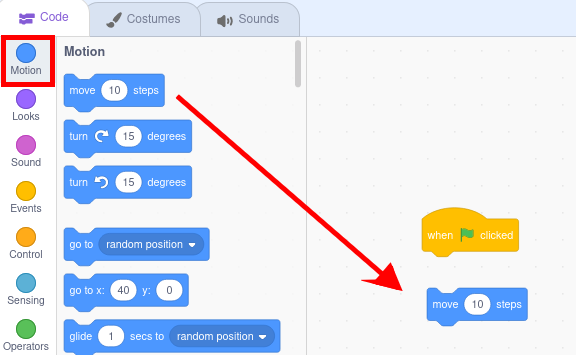
and match it.

5 Click on the green flag to run the program.
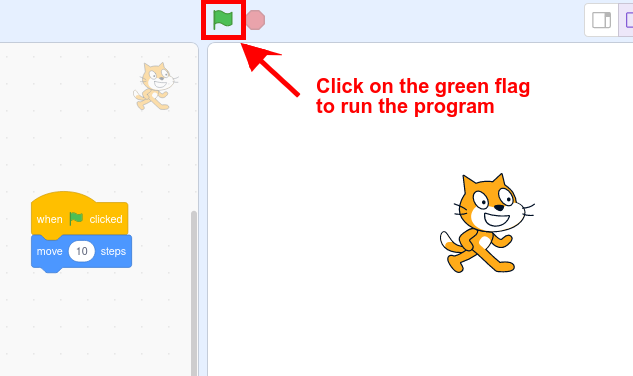
You'll see Scratch cat move a little to the right! It moves 10 steps, corresponding to 10 pixels.
The program terminates only because it has finished executing all instructions. Therefore, you do not have to press the red Stop button (next to the green flag) to finish. The Stop button will be useful when our program has control blocks that involve continuous repetition of execution (this will be seen later).
Activity: Moving the blocks
We continue with our project.
Instead of 10 steps, make it advance 50: To do this, click on the number 10, delete the 10 with the keyboard and write 50, and try it again.
Managing blocks: You will notice that the blocks in the program area can be moved.
- If you move the orange "When flag clicked" block, the blue "move 50 steps" block will also be dragged.
- If you move the blue "move 50 steps" block, it will disengage from the block above.
The blocks remain linked, and when we drag a block, everything below it will move with it, but it will detach from its upper blocks.
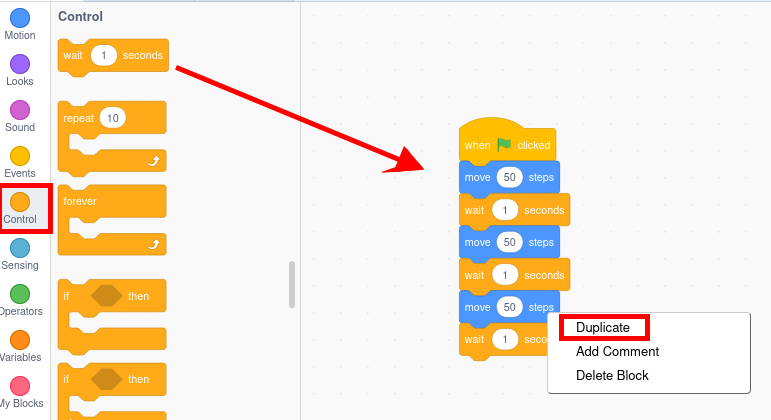
After the blue "move 50 steps" block, add the "wait 1 second" block, which is in the Control blocks.
Also add several more blue blocks, so that they are interspersed, as shown in the following image, and try it. To do this you can use Duplicate, a very interesting option that appears when you right-click on a set of blocks.
Activity: Deleting blocks
To delete a block (and everything below it):
- A Option : Drag it again to the block area where you took it.
- B Option: Right click on it- Delete block".
To remove a block that is nested in the middle of other blocks: unpack it from the top, unpack everything from the bottom, delete it, and fit the upper blocks with the lower ones. The following image shows how to delete the "move 50 steps" block that is in the middle:

To undo any action, you can use the Ctrl-Z key combination
Finally, save your work with the name blocks.sb3
Sprites, costumes and stages
Activity: Sprites
Open a new file.
A new project in Scratch always comes with a sprite: it's a Cat. You can change the name of the sprite by clicking on the box Sprite
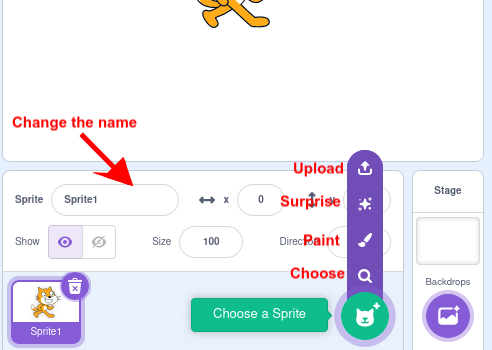
Add a new sprite from the Sprites library, specifically the "Dog1" sprite. It is in the Animals category.
Activity: Costumes
Each sprite can have many costumes. The default Cat comes with 2 costumes. We can add a new costume to an object.
Add a new costume to the Cat object: First click on the Cat object. then add the Cat2 costume to the Cat object from the costume library.
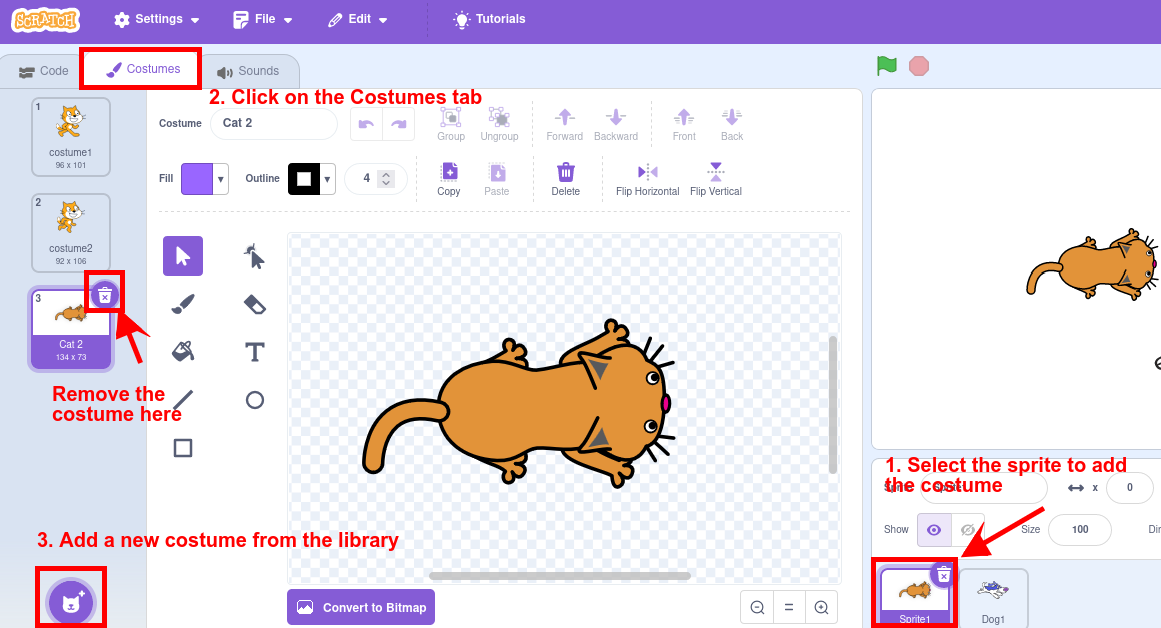
We can also delete costumes: Delete the costume2 of the cat.
Activity: stage
The stage in Scratch behaves like another sprite, which can have associated programs (although obviously without some blocks such as motion), costumes (here called backdrops) and sounds..
Initially the stage is white. We can have several images prepared that we can make the background of the program.
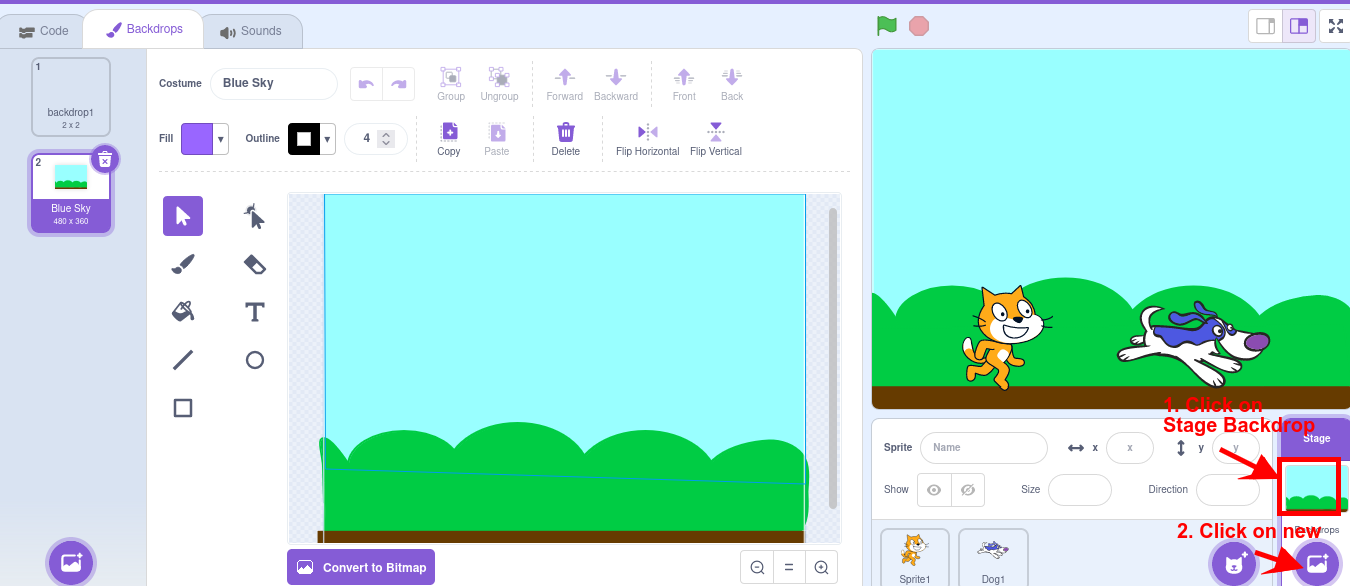
Add a background from the backdrop library, for example the "blue sky" backdrop.
Finally save your work with the name sprites.sb3
Programs and motion
Activity: Add a new program
Open a new file.
Drag and drop the necessary blocks so that when the green flag is clicked, the cat moves 10 steps (you did it in the blocks section)
Let's add that when you press the "a" key, the sprite rotates 90 degrees:
- We will have to use an Events block, specifically the "when space key pressed" block. I put space in italics because we can change it. By clicking on "space", we can change it to "a".
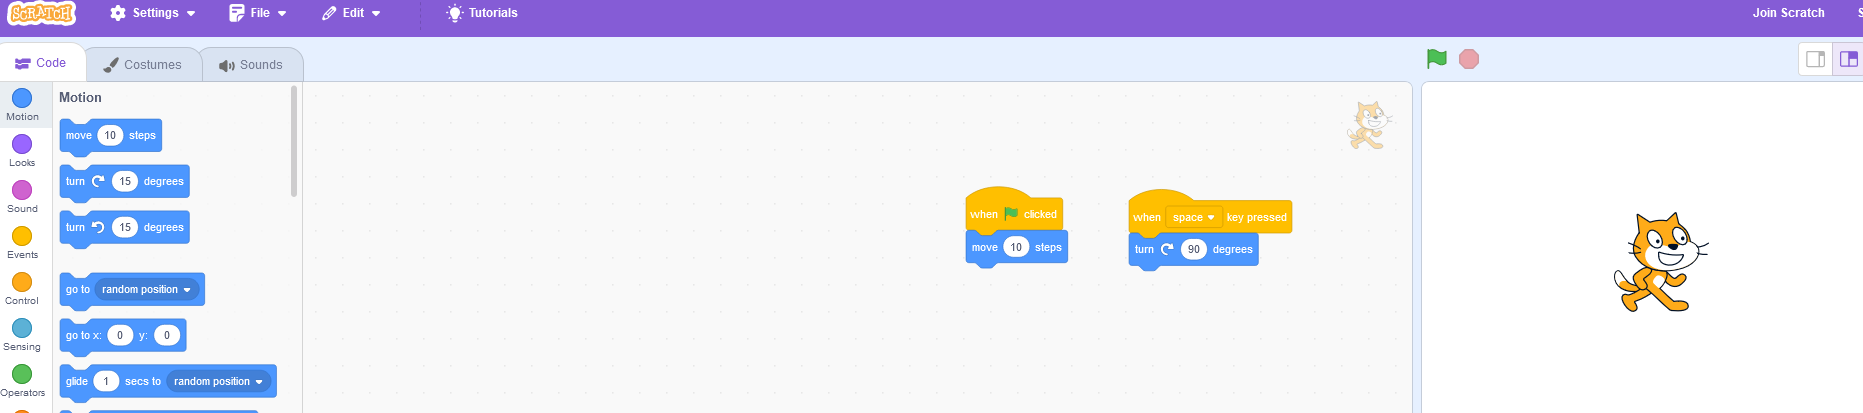
Notice that there are 2 programs in the central area. Each sprite can have several programs, which work in parallel.
IMPORTANT: The programs are identified by starting with an "Events" block whose upper part is oval.
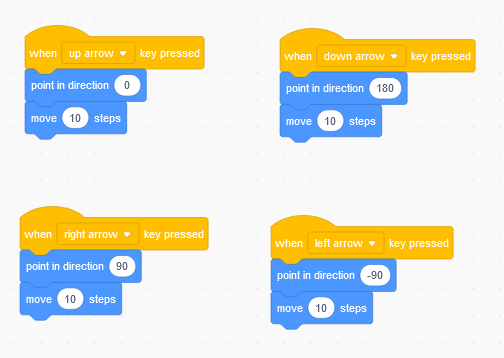
Practical case I
The sprite moves in the direction it is pointing. There is a block that makes the sprite point to another address:

Make the sprite move according to the keyboard arrows.
Solution:
Practical case II
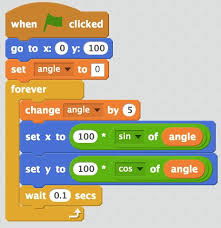
The position of a sprite is controlled with X and Y coordinates. The position of these coordinates on the screen is as follows:
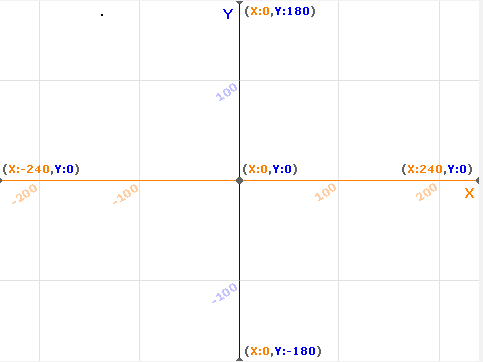
This image is a backdrop that is already created in Scratch (XY-grid), and that you can add to your project.
Add this program to your cat.

What does this program do?
Solution
This program moves the object to the lower right area of the screen when the b key is pressed.
Finally, save the file as programs.sb3
Sound, Music and Pen
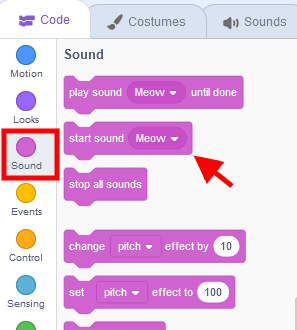
Sound
Sound blocks are used to play sounds at some point in our program. Each sprite comes with a default sound. But we can record or add sounds that we already have on our computer:

Music
In addition to sound blocks, Scratch also has a set of blocks to add music to our programs
Where are the music blocks?
We have to add a new extension

A new window pops up and you can find different sets of blocks you can add. Pen block is also an interesting extension we will see in the next point.

Add the Music extension to your software.
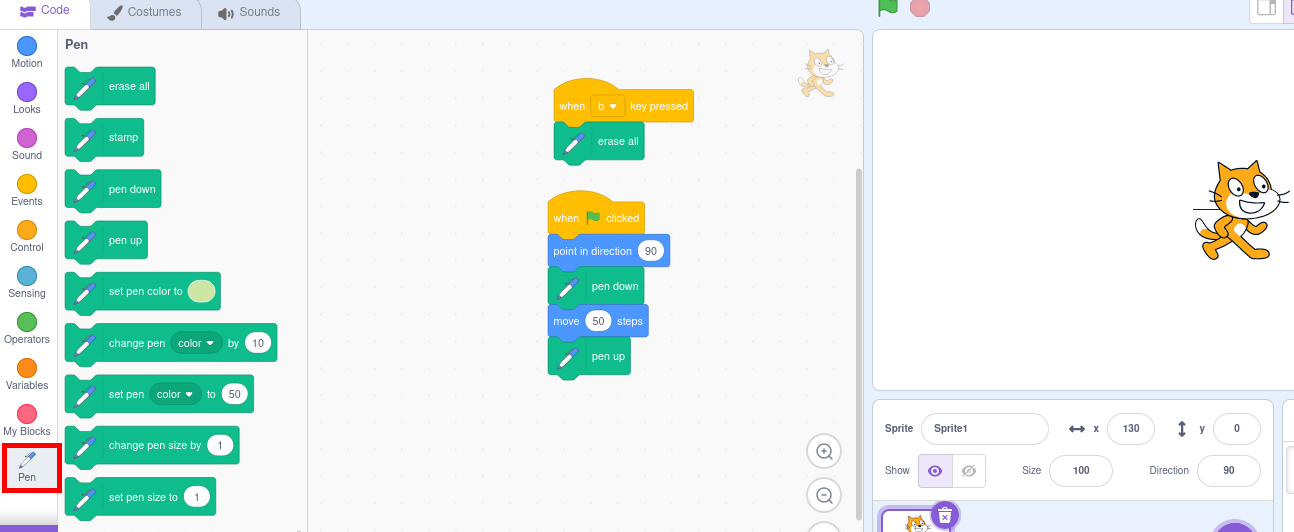
Pen
The Pen blocks are used to leave a trail for the sprite to move through. To use them you will have to add the extension as it has been explained in the Music section.
Add the Pen extension to your software.
To leave the trail drawn, it is necessary to add the "pen down" block prior to the movement. When we finish painting, we will have to put the "pen up" block so that when we move the sprite again it will no longer paint.
It is possible to paint with different colors and thicknesses. The "erase all" block is used to erase everything painted. We can put a Program that when pressing the "b" key deletes everything.
You can try placing these blocks to see their effect:
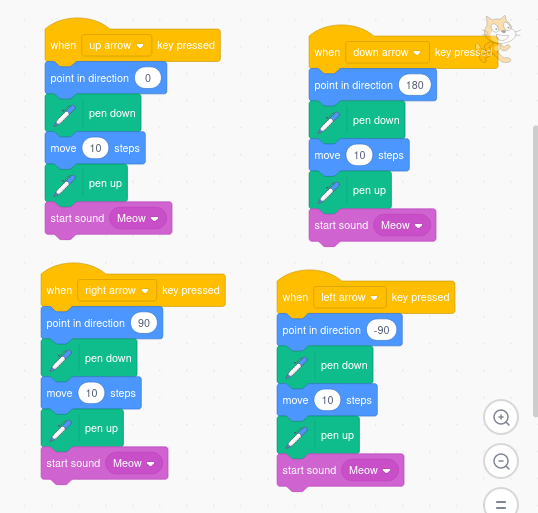
Practical case
Make a program that shows the path the cat has moved. Add a "meow" sound after you've painted the line.
Solution
Save the program with the name soundpen.sb3
Control: loops
Practical case:
To better understand what repetitions are, we are goint to make a program that draws two dashed lines.
Solution:
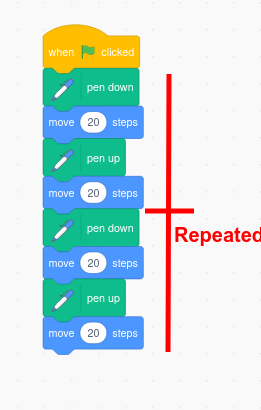
You can duplicate the blocks (right click - duplicate) so you don't have to build the same thing twice.
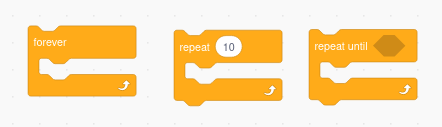
What if you had to paint many lines? That is, repeat the same thing many times. Then you can add a control block to do repetitions. Repetitions are also called "loops." It is possible to add 3 types of loops:
- They repeat themselves constantly, forever.
- They are repeated a specific number of times
- They repeat until a condition is met
Practical case
Create a program with a sprite that draws 10 dashed lines in a row.
Solution

Practical case
Add a new program, when the space key is clicked to draw a square
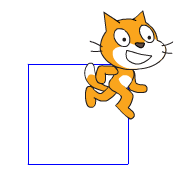
Solution
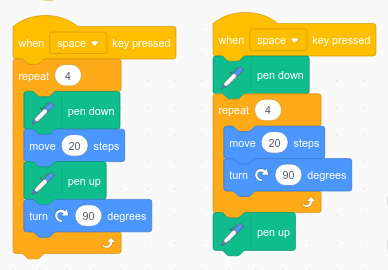
There are two possible solutions to drawing the square using the block of repetitions. Below are the two possible programs.. The pencil up and down blocks can be inside or outside the repetition block. In this example the result will be the same, although the one on the left is more efficient for code purposes since it does not execute the pencil down and up instructions unnecessarily.
Practical case
Make the cat change costumes constantly. Add a 1 second delay to make the costume change a bit slower.
Solution

Finally, save the program with the name loops.sb3
Control: conditions and sensors
Conditions are a type of blocks that evaluate something, and if it is true, then the blocks nested inside it are executed. They are available in the Control menu.
Open a new file.
Add these blocks and test them by clicking on the flag.
The green blocks are in the operators menu. The purple blocks in the Looks menu.
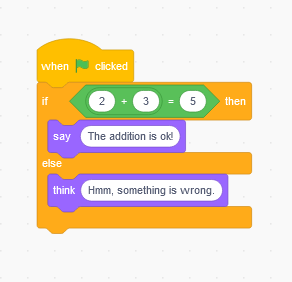
In these blocks it is verified that 2+3=5, and since it is true, then the cat says "The addition is ok". If you change the 5 to any other value, for example 6, the condition 2+3=6 is false, and the cat says "Hmmm, something is wrong."
Try the program changing the values to get right or wrong answers. Then delete it.
Practical case
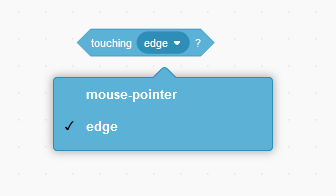
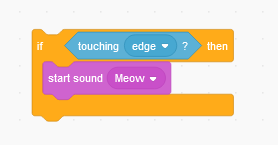
Let's create a program that will make the cat meow when it touches the edge of the stage. To do this, in the Sensing menu, we will use the Touching? block.
We will need the sound menu too.
Solution
First we have to create the blocks that check if we are touching the edge, and then meow:
A possible solution in the previous exercise for adding the edge touch check is to add it right after moving the cat in all directions. The option duplicate is perfect for this.

Save the program with the name conditions1.sb3
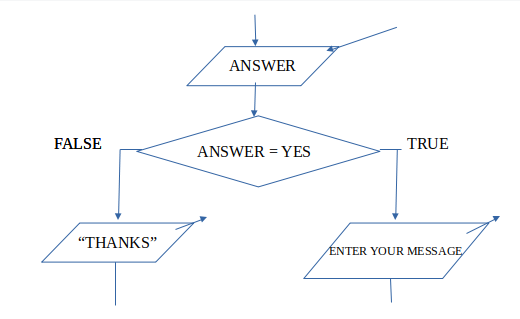
Sensing blocks allow to add more interactivity with the user, with the block ask and wait.
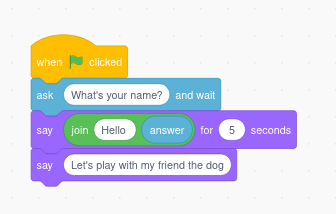
Practical case
Create a new program that asks you your name, and then greet you saying "Hello" and your name, and then invite you to play with the dog.
Solution
We will use a system variable available in Sensing blocks called answer that stores the answer received, and the operator block to concatenate words in a text message.
 Save this program with the name conditions2.sb3
Messages
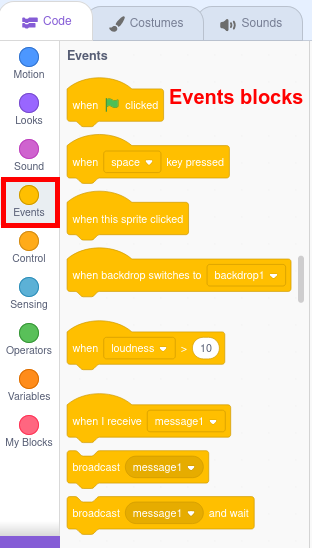
We can communicate two programs either within the same sprite or between different sprites or with the stage by sending messages. A message can be sent from a program from one sprite to another, to perform some action on it. These blocks are located in "Events".
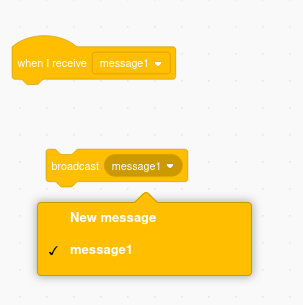
Practical case:
Open a new file and include two sprites: one cat and one dog.
Add programs to the cat so that you can move it with the keyboard. (see motion section)
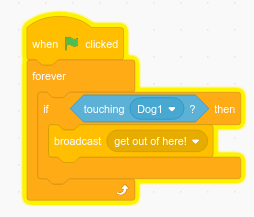
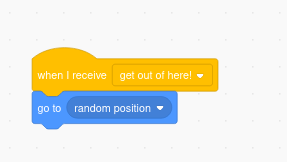
We are going to make it so that when the cat touches the dog, the cat program broadcasts a message to the dog program. When the dog receives the message, it will change its position, to a random position.
Solution
When Flag clicked, if the Cat touches the dog (Dog1), it sends a message.
Program to include in Cat code:
That message is received by the Dog1 sprite, and makes the dog move to a random position on the screen.
Program to include in Dog1 code:
Save it with the name messages.sb3
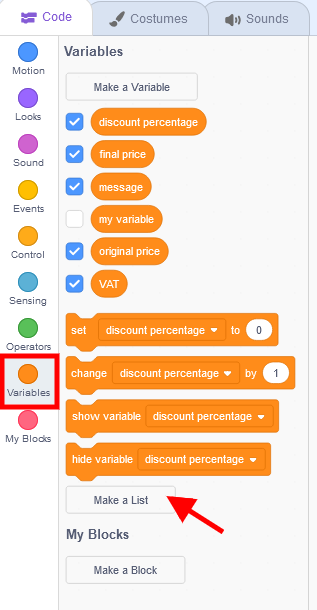
Variables
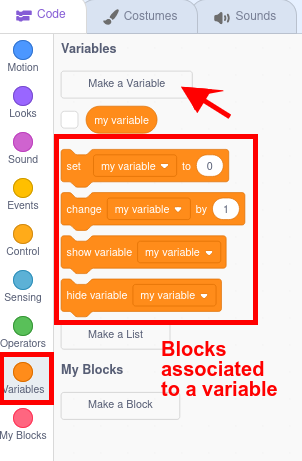
We can understand variables as a "name" that contains a "value." We can assign a value to the variable. And we can recover the value of the variable. When you make a new variable, these variable control blocks appear in "Variables".
Practical case:
Open a new file.
Make a new variable and call it "SCORE"
Solution

Variables as you have seen can be created to be recognizable and usable for all sprites (global), or only for a certain sprite (local). The first case is the usual, although in cases such as counter variables it may not be necessary for them to be global if they are only going to be used by a single sprite.
Let's add some more complexity.
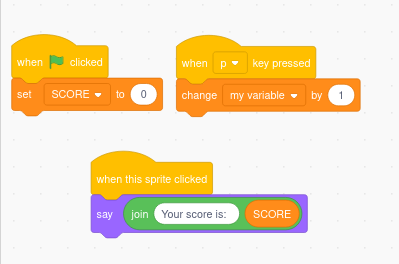
- Make the SCORE value set to 0 when you start the game. You can put this program on the stage or on any of the sprites you have defined.
- Make pressing the "p" key increase the POINTS value by 1. It can go on any sprite or the stage.
- Make the cat say the SCORE value when you click on the Cat. This program has to go in the Cat sprite.
Solution
Save the file with the name variables.sb3
Your first game
Practical case: Let's create our first game!
With all this we can create a simple game.
- At the beginning of the game, just the cat appears on a Stage of your choice, asks your name, greets you and invites you to play.
- Next the dog appears.
- We will move the cat with the arrows of the keyboard. As the cat moves, it changes of costume simulating it walks.
- When the cat touches the dog, the dog moves to a random place and barks and the program ends.
- Add any other feature of Scratch you feel interesting.
Save it with the name 1stgame_pcXX.sb3
Basic elements in programming
Output
Normally we program because we want to obtain a result. This result is what we usually call OUTPUT of the program, although everything that the program shows to the user receives the same name.
When you are taking your first steps in programming, you usually start by creating the Hello World program, which is a program that displays that message on the screen. This simple program will help us become familiar with the outputs. Let's see how to do it step by step:
Program: Hello world
Statement:
Create a program that shows on the screen the message "Hello world!"
Steps 1 and 2: Analysis and flowchart of the Hello world program
According to what was seen in the first section, it would have the following elements:
- Start and end terminals of the algorithm.
- A single output that would display that message.
FLOWCHART:

Steps 3, 4 y 5: Coding, compilation and checking of the Hello world program with Scratch
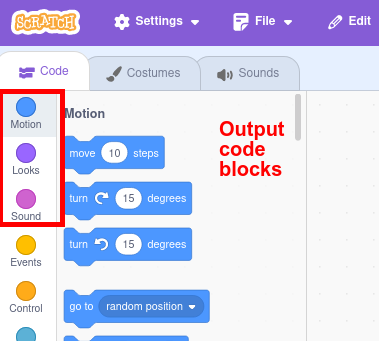
The code blocks associated with the outputs are:
- Motion: produce movement in the selected sprite.
- Looks: produce some change in the appearance of the selected sprite.
- Sound: produce some sound associated with the selected sprite.
Specifically, for our program we are interested in a couple of Looks blocks:
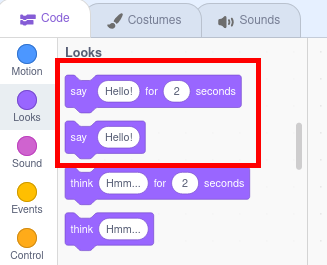
These blocks will show the sprite saying a message, in the first case for a certain time, in the second indefinitely.
Finally we will have to mark the beginning and end of the program. In Scratch, the start is marked by clicking on the green flag at the top of the program window, and that order is found in the Events block. The ending is not specified.

When you click on the green flag, the sprite to which we have assigned the code will come out saying that message.

Save the program with the name spritehello.sb3
In this case we have associated the OUTPUT to a sprite. In the same way we could have associated it with the stage.
We have first to create a new backdrop with this message, using the Editor, and then change the backdrop to this, in the Looks block.
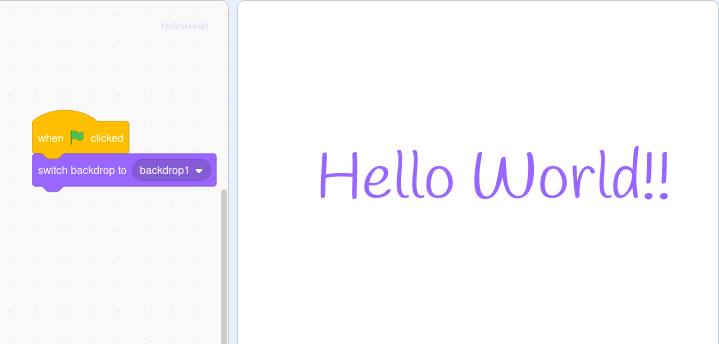
Save the program with the name stagehello.sb3
Input
A program like the example of the Hello World is not typical in programming. Increasingly, we seek to create programs that carry out actions that are not merely pre-programmed and automated, but rather react based on parameters provided by the user. All data that is provided to the program externally for subsequent processing is what we call INPUTS.
Inputs can be supplied in two ways:
- Manually: they are requested from the user and they enter them, normally via mouse or keyboard.
- In an automated way: through sensors that provide information about the environment. Of course with PSeInt we can't do this, but with Scratch we can.
To better understand the concept of Input, we will create a variant of the Hello World program that we will call Transmitting your message in which the program will request from the user the message they want to transmit, and then display it on the screen. Let's go step by step:
Program: Transmitting your message
Statement:
Create a program that requests from the user a message and then shows it on the screen.
Steps 1 and 2: Analysis and flow chart of the Transmitting your message program
Let's first look at the necessary elements in this program and its flowchart:
- Start and end
- Output: A first output is needed asking for the content of the message and a second showing it.
- Input: the content of the message.
- Storage: In this program a new concept appears, which is that of a variable, that is, a "container" that stores the data it receives from the input, for later processing.
The flowchart is:

Steps 3, 4 y 5: Coding, compilation and checking of the Transmitting your message program with Scratch
In Scratch, part of the blocks related to data input into the program are found in the SENSING menu (light blue) We also provide inputs with the EVENTS menu (yellow), with blocks to indicate what external action will determine whether the program is executed one way or another.
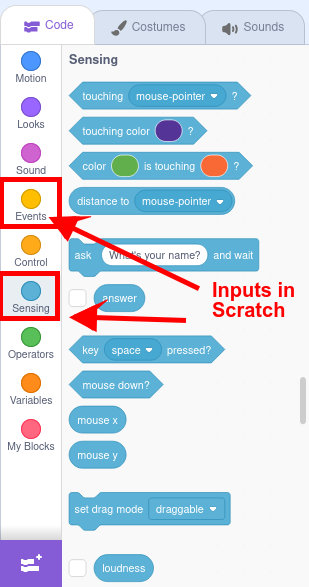
SENSING includes both blocks to ask and receive direct answers from users, as well as other types of input related to touching something (other objects, colors), being at a certain distance, reaching a sound volume, finding oneself in a certain area of the canvas, pressing a key or the mouse, etc...
If we want to program something similar to the previous program we would have to use the following blocks:

Scratch stores what is entered by keyboard in a predefined variable called answer, available in the same sensing menu. Variables and other data storage structures are the objective of the next point.
Save the file with the name message.sb3
Storage
In order to operate with the data, we must previously reserve memory spaces in which to store it. These are what we call data storage structures.
These structures must be defined by:
- Identifier: name that we give to the data during the program to refer to it.
- Type: nature and range of values that can be stored (number, text, boolean...)
- Value: specific content of the data at that moment.
In this course we are going to learn about only two structures, variables and vectors (also called arrays or lists in Scratch), although we are only going to focus in depth on the first one.
Variables and constants
They are spaces that store a single DATA of a different nature, and to which a name that identifies it is associated. The type of data they can store are:
- Numeric: they can be integers (int) or real (float), depending on whether or not they accept decimals, generally with Anglo-Saxon notation where the decimal is marked with a dot.
- Characters (char): letters or typographic signs. They are defined by enclosing the character with a single quote.
- Character strings (string): words or phrases. They are defined by enclosing the text with double quotes.
- Logical (Boolean): Supports values of TRUE or FALSE.
Variables, as their name indicates, are data structures that will take different values throughout the execution of the program, while constants adopt the same value throughout the program (For example, the PI number, or the percentage of the VAT).
It is very important to properly select the name of the variables and constants so that they help understand the stored data. Generally, constants are defined with names in uppercase and variables in lowercase.
To learn more about how it works, we are going to create the following program. We will call it SALES CALCULATOR.
Program: Sales calculator
Statement:
Create a program that requests from the user a price and an offer percentage. Later, based on a VAT percentage (Constant), the program shows a message with the total price to pay, VAT included.
Steps 1 and 2: Analysis and flow chart of the Sales calculator program
The elements involved will be:
- Start and end of program.
- Outputs: Request original price and discount percentage, and show the final price.
- Inputs: Original price, discount percentage
- Storage: original price (real number because it can be decimal), discount percentage (integer number because we will use the value as a percentage), final price (real number), VAT percentage (constant), and optionally the message to display (constant)
- Processing: addition, multiplication and division.
The flowchart is:
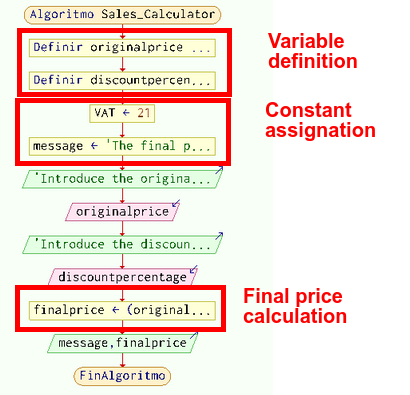
Variables could also be assigned initial values, although they will be modified throughout the program. If this is not done, 0 or empty is assumed as the initial value.
Steps 3, 4 y 5: Coding, compilation and checking of the Sales Calculator program with Scratch
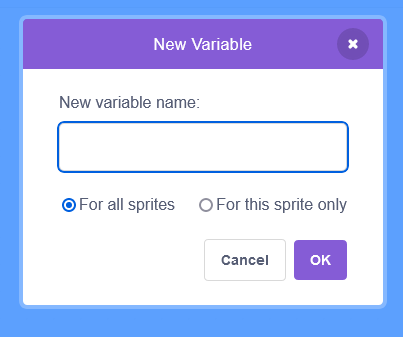
In Scratch, data storage structures are located in the Variables block. From there we can create as many variables as we need, and also assign them the desired value using the corresponding block.
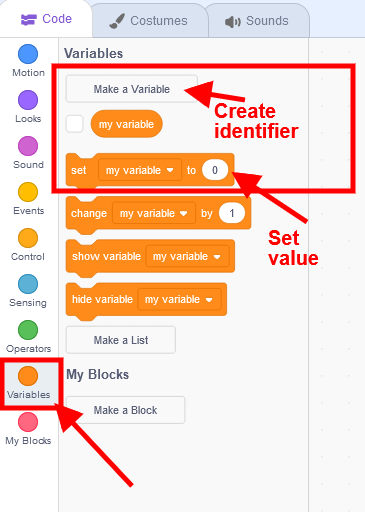
When creating a variable, the first thing it asks us for, apart from its identifier, is to know if it is defined as local (only for this sprite) or as global (common for all sprites). In this course we only develop programs for the same object, so it doesn´t matter.
Once the necessary variables have been defined, we will go on to create the code in the object using sensing, looks and the arithmetic and concatenation operators that we need, and which we will see in more detail in the next section. The code in blocks would look like this:
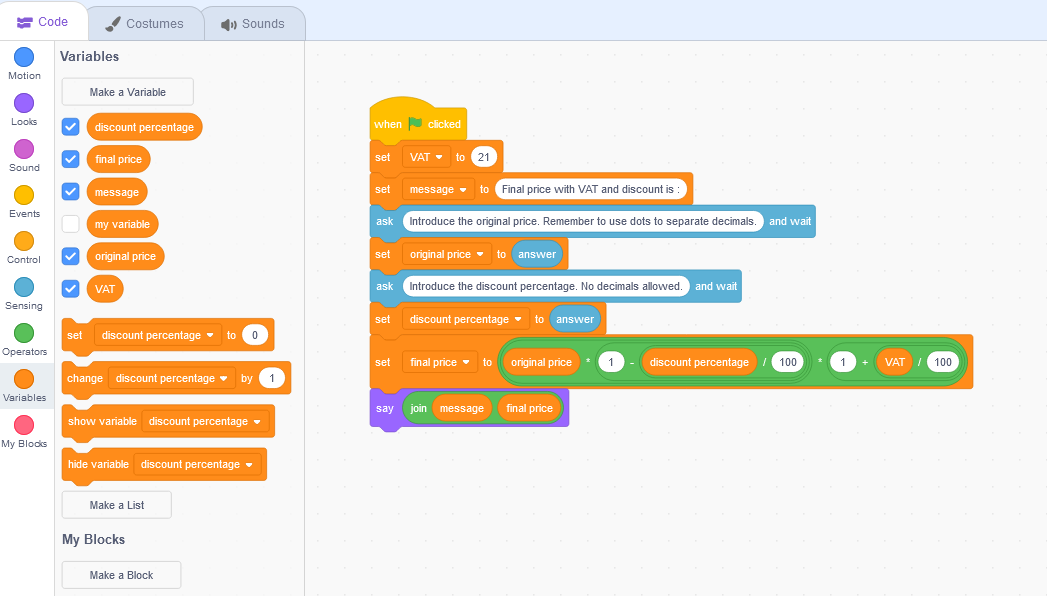
Save the file with the name salescalculator.sb3.
Complex data storage structures
Although it is not the subject of this course, in programming data sets can be stored as long as they are of the same type in other types of complex structures, the so-called arrays, which in Spanish are translated as vectors or matrices, and in PSeInt they are called dimensions.
Scratch only contemplates the use of lists that would be ordered series of data of the same type, and that are available within the same Variables block.
Processing
Types of operations
The operations to be performed with the data can be:
- Arithmetic: classic operations of addition, subtraction, multiplication and division or maths operations.
- Logics: comparisons, negation, AND, OR.
- Concatenation: union of several elements (strings of characters or variables of different types)
- Loops: Involves performing actions repeatedly. In this case it will be convenient to distinguish two types:
- Previously known number of times to repeat the action: we will use the For or Repeat structures.
- Number of times to repeat depending on values obtained: we will use the structures While (While...do) or Repeat until (Do...while), depending on whether we want to evaluate the condition before or after the first iteration. We will see that these structures are conditional as well as repetitive.
- Conditional: implies carrying out some actions or others by making decisions. Structures If-then (If-else), and Switch.
We have already seen the first three types of operations in the previous examples. We will now focus on the last two, although we will introduce various operations in the examples to delve into their use.
Iterations and loops
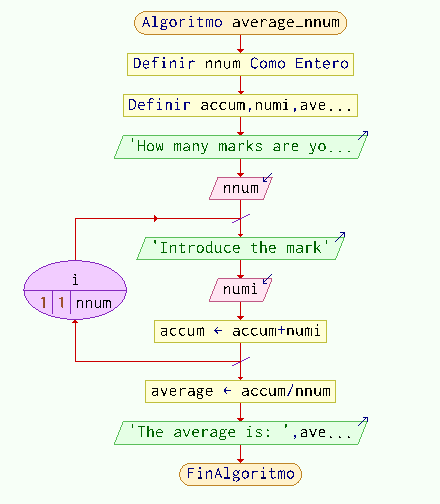
To practice with these structures, we will create a simple program that will calculate the average of several numbers (marks, for example). In this case, since the number of iterations is known, we will use the FOR/REPEAT statement. Likewise, we will use arithmetic and concatenation operators.
Program: Average of n marks
Statement:
Create a program to calculate the average of several numbers . First, the program requests the number of marks to average, then it asks that the marks be entered as many times as we have told it (here is the repetition). At the end, it shows the average.
Steps 1 and 2: Analysis and flow chart of the Average of n marks program
The elements involved are:
- Start and end of algorithm.
- Outputs: Request number of marks, show average.
- Inputs: number of marks and marks to be averaged.
- Storage: number of elements (integer), entered numbers (real number), cumulative sum of numbers (real number), and average (real number)
- Processing: loop, concatenation, addition and division.
The flowchart associated with the FOR/REPEAT instruction is as follows:
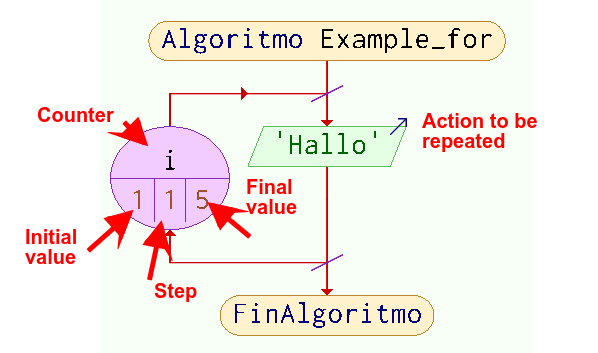
Flowchart:
Steps 3, 4 y 5: Coding, compilation and checking of the Average of n marks program with Scratch
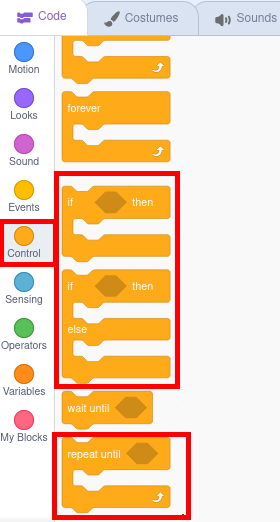
In Scratch the blocks related to repetitive structures are found in Control and are Forever, Repeat and Repeat until.
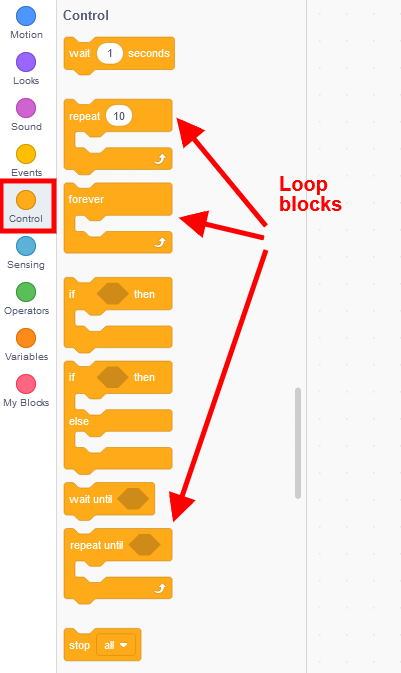
In our cas, as the number of iterations is defined, we will use repeat.
First of all, in the Variables block we will define the necessary variables.

In an analogous way, using the Sensing, Looks, and Variables blocks explained in the Inputs, Outputs and Storage sections, we build the program. In Operators we will find the blocks necessary to carry out arithmetic, logical and concatenation operations.

The final program with all the elements would look like this:
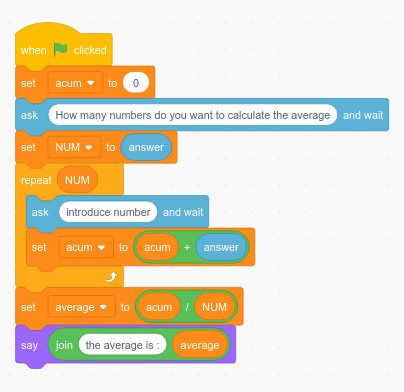
Save the program with the name averagenmarks.sb3
Be careful with setting the initial value at the beginning of your variables, as it happens in the example with accum.
Conditionals
To practice with these structures, we will carry out a simple program in which
Program: Report
Statement:
Create a program that requests a numerical grade, verifies if the value received is correct (between 0 and 10) and finally tells us whether the grade corresponds to a PASS or a FAIL.
Steps 1 and 2: Analysis and flowchart of the Report program
Involved elements are:
- Start and end of algorithm.
- Outputs: Request numerical mark, show pass or fail or error message.
- Inputs: numerical mark
- Storage: numerical mark (real number, may be decimal)
- Processing: logical (comparison, AND, OR) and conditional
Flowchart:

In this case we have defined the error condition using the logical operator OR, indicating that any mark less than zero or greater than 10 is considered erroneous. This program can be solved in an analogous way using the operator AND, indicating that it considers any numerical mark valid greater than or equal to zero and less than or equal to 10.
Steps 3, 4 y 5: Coding, compilation and checking of the Report program with Scratch
In Scratch the blocks related to conditional structures are found in Control, next to the loops.
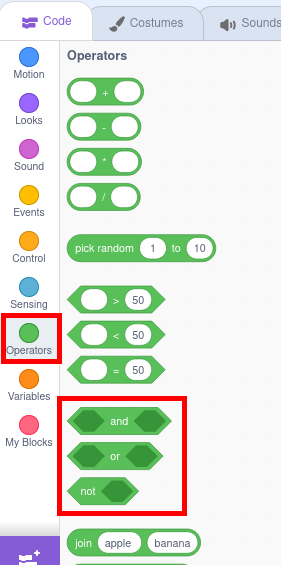
The logical operators AND and OR are found in Operators, along with the comparison operators and those already seen previously: arithmetic, concatenation...
As in all programs, we will start by defining the necessary variables, in our case only one from the Variables blocks.
Next we will request the rating using the block available in Sensing and we will store its response in the newly created variable.
Finally, we will evaluate the response obtained through the corresponding Control block and using the logical operators of Operators, depending on their value, we will offer the error message or write the final grade with the corresponding Looks block.
The resulting code would be the following:
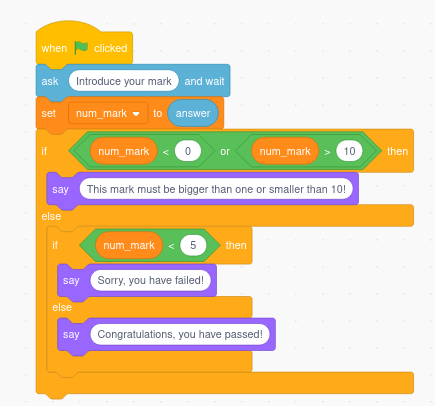
In this case we use the OR operator because Scratch does not have the combined operators less than or equal and greater than or equal, and thus we save ourselves from having to combine both operators with a logical operator OR. Remember the KISS principle.
Finally, we verify the correct functioning of the program and its robustness against the most common errors. In Scratch we execute by clicking on the green flag.

Save the file with the name report.sb3
Comments
A comment in programming is text in our source code that the compiler ignores. And if it is ignored, why do we put it on? Usually to give us internal explanations of what the function of each part of the program is. They are also very useful for temporarily discarding code fragments, without having to delete them, and thus facilitate their later recovery.
Comments in programming are essential:
- They facilitate understanding: not only of other users but also of the programmer himself throughout the duration of the development of the program.
- They encourage collaboration: they make the code understandable for other co-programmers who can also participate.
- They facilitate error debugging: commenting and uncommenting code fragments will allow us to detect where errors are occurring.
Comments in Scratch
In Scratch you can add comments from the code editing window associated with each object. Comments can be either associated with a block or on the editing window itself. They are added by right-clicking on the place where we want to insert the comment.
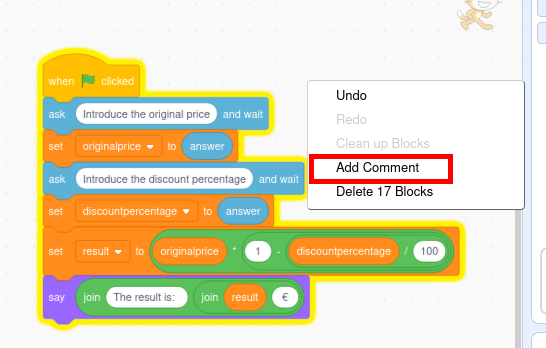
Once added, they remain as visible notes in the code editing area.

Of course in Scratch there is no option to comment and uncomment blocks so that they are not taken into account by the compiler. The option available to do this is to separate the event that determines the execution of that block and the code will be temporarily deactivated.

Modify any of your previous files by adding several explanatory comments.
Rename and save it with the name comments.sb3