Starting to use Scratch
- Blocks
- Sprites, costumes and stages
- Programs and motion
- Sound, Music and Pen
- Control: loops
- Control: conditions and sensors
- Messages
- Variables
- Your first game
Blocks
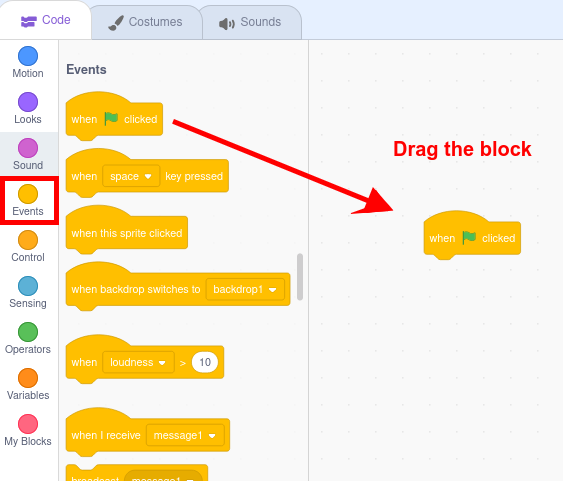
We are going to make our first program in Scratch:
- Click on the Code tab, in the Events menu
- Drag the "When green flag clicked" block:
3. Click on Motion now.
4. Drag the block "move 10 steps" to the right area and place it by dragging it just below the "When flag clicked" block:
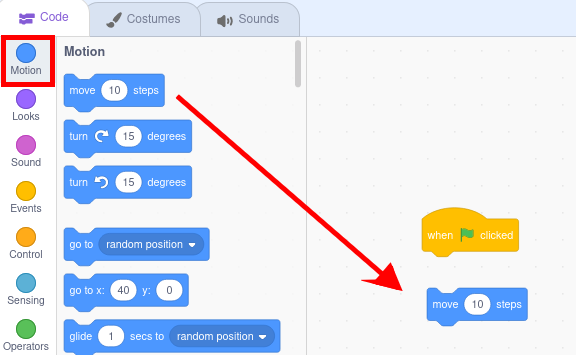
and match it.

5 Click on the green flag to run the program.
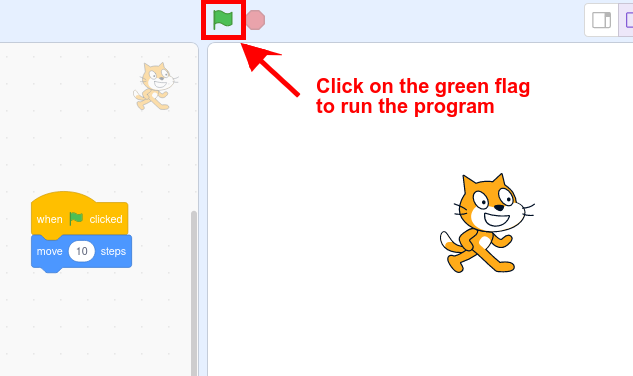
You'll see Scratch cat move a little to the right! It moves 10 steps, corresponding to 10 pixels.
The program terminates only because it has finished executing all instructions. Therefore, you do not have to press the red Stop button (next to the green flag) to finish. The Stop button will be useful when our program has control blocks that involve continuous repetition of execution (this will be seen later).
Activity: Moving the blocks
We continue with our project.
Instead of 10 steps, make it advance 50: To do this, click on the number 10, delete the 10 with the keyboard and write 50, and try it again.
Managing blocks: You will notice that the blocks in the program area can be moved.
- If you move the orange "When flag clicked" block, the blue "move 50 steps" block will also be dragged.
- If you move the blue "move 50 steps" block, it will disengage from the block above.
The blocks remain linked, and when we drag a block, everything below it will move with it, but it will detach from its upper blocks.
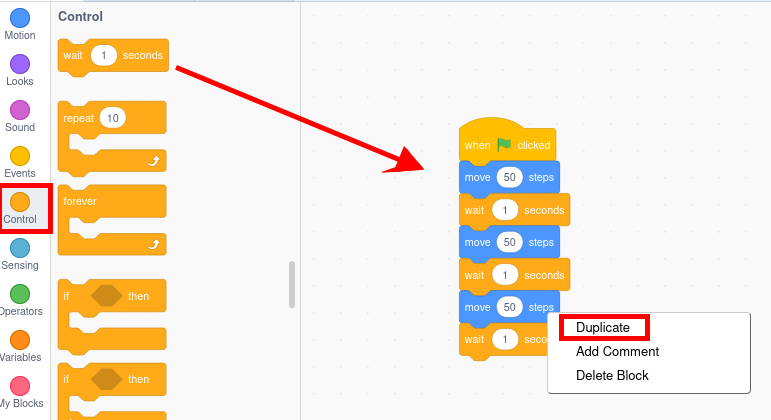
After the blue "move 50 steps" block, add the "wait 1 second" block, which is in the Control blocks.
Also add several more blue blocks, so that they are interspersed, as shown in the following image, and try it. To do this you can use Duplicate, a very interesting option that appears when you right-click on a set of blocks.
Activity: Deleting blocks
To delete a block (and everything below it):
- A Option : Drag it again to the block area where you took it.
- B Option: Right click on it- Delete block".
To remove a block that is nested in the middle of other blocks: unpack it from the top, unpack everything from the bottom, delete it, and fit the upper blocks with the lower ones. The following image shows how to delete the "move 50 steps" block that is in the middle:

To undo any action, you can use the Ctrl-Z key combination
Finally, save your work with the name blocks.sb3
Sprites, costumes and stages
Activity: Sprites
Open a new file.
A new project in Scratch always comes with a sprite: it's a Cat. You can change the name of the sprite by clicking on the box Sprite
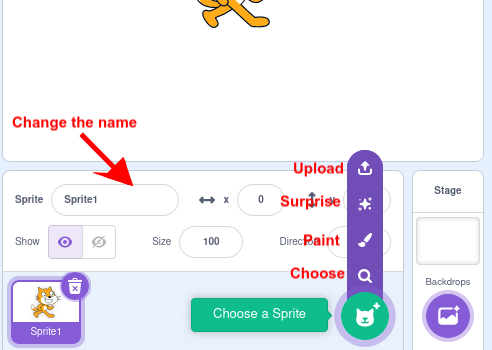
Add a new sprite from the Sprites library, specifically the "Dog1" sprite. It is in the Animals category.
Activity: Costumes
Each sprite can have many costumes. The default Cat comes with 2 costumes. We can add a new costume to an object.
Add a new costume to the Cat object: First click on the Cat object. then add the Cat2 costume to the Cat object from the costume library.
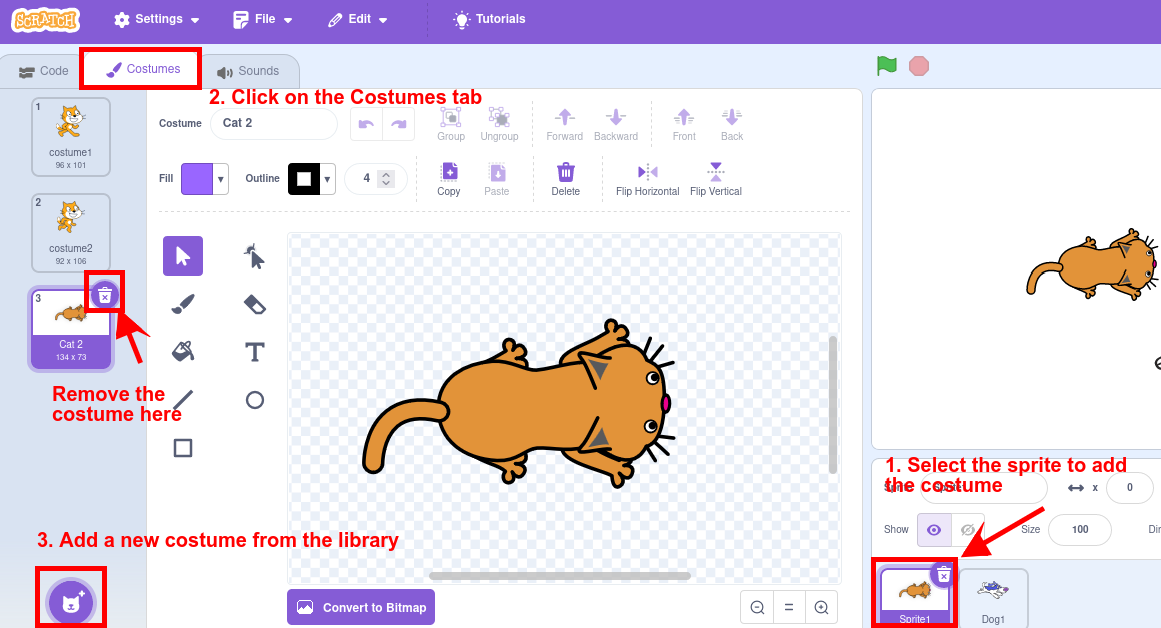
We can also delete costumes: Delete the costume2 of the cat.
Activity: stage
The stage in Scratch behaves like another sprite, which can have associated programs (although obviously without some blocks such as motion), costumes (here called backdrops) and sounds..
Initially the stage is white. We can have several images prepared that we can make the background of the program.
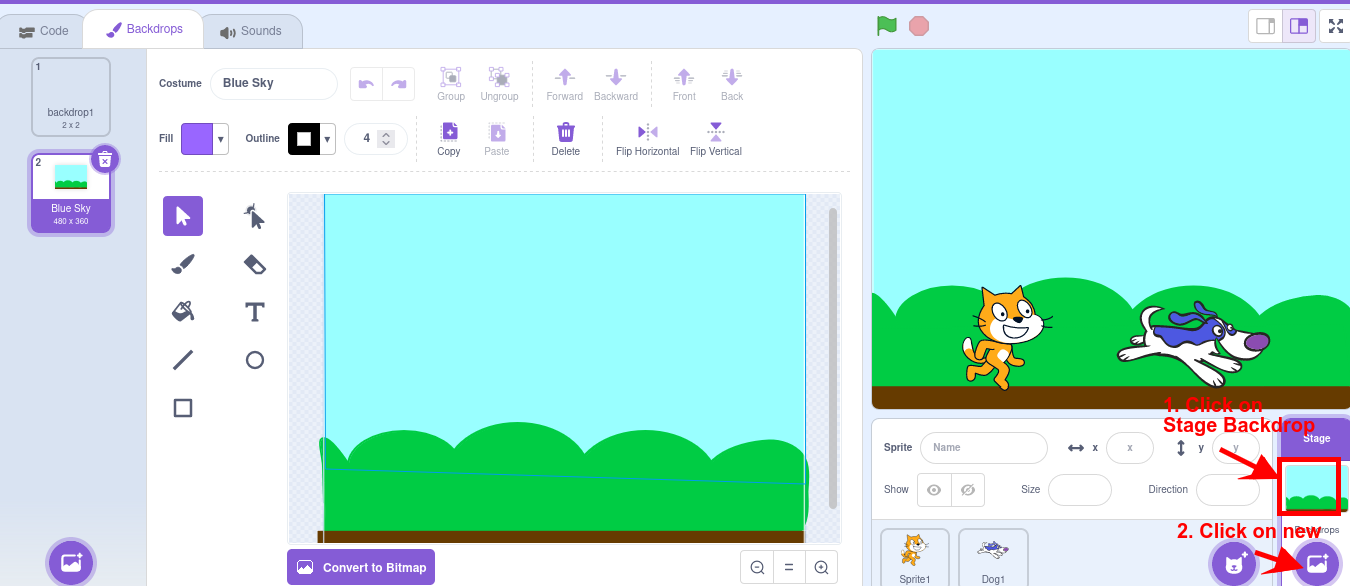
Add a background from the backdrop library, for example the "blue sky" backdrop.
Finally save your work with the name sprites.sb3
Programs and motion
Activity: Add a new program
Open a new file.
Drag and drop the necessary blocks so that when the green flag is clicked, the cat moves 10 steps (you did it in the blocks section)
Let's add that when you press the "a" key, the sprite rotates 90 degrees:
- We will have to use an Events block, specifically the "when space key pressed" block. I put space in italics because we can change it. By clicking on "space", we can change it to "a".
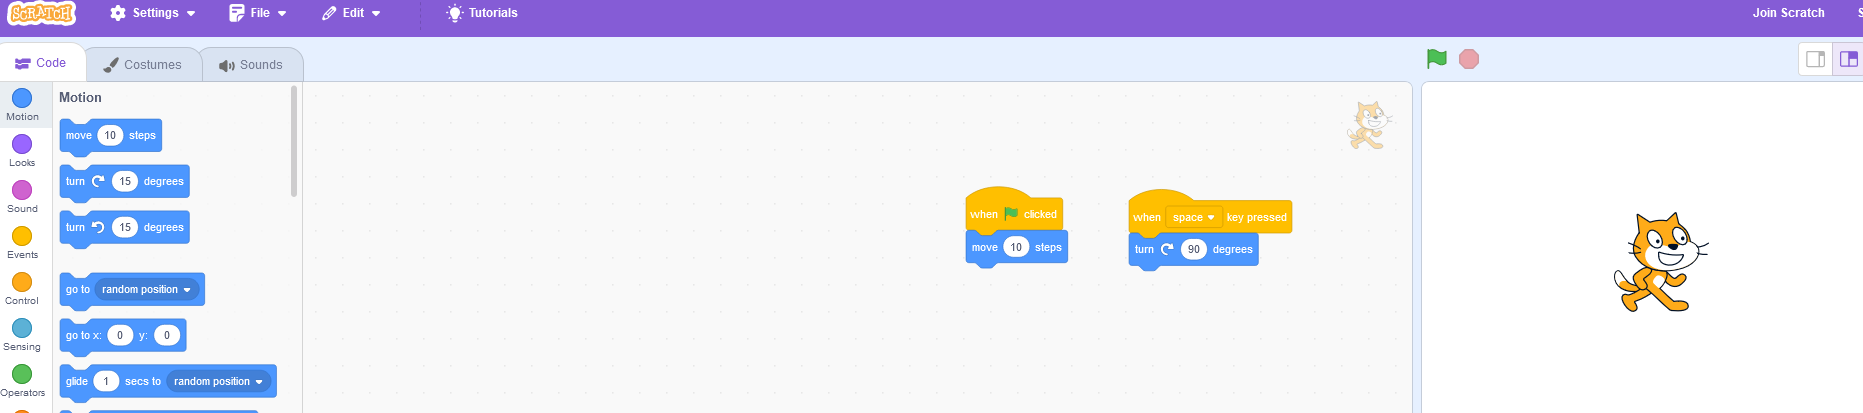
Notice that there are 2 programs in the central area. Each sprite can have several programs, which work in parallel.
IMPORTANT: The programs are identified by starting with an "Events" block whose upper part is oval.
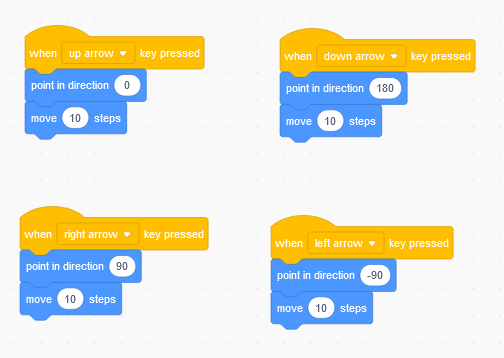
Practical case I
The sprite moves in the direction it is pointing. There is a block that makes the sprite point to another address:

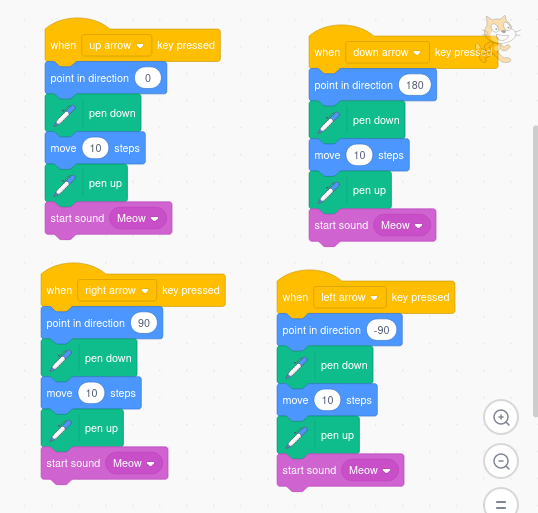
Make the sprite move according to the keyboard arrows.
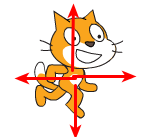
Solution:
Practical case II
The position of a sprite is controlled with X and Y coordinates. The position of these coordinates on the screen is as follows:
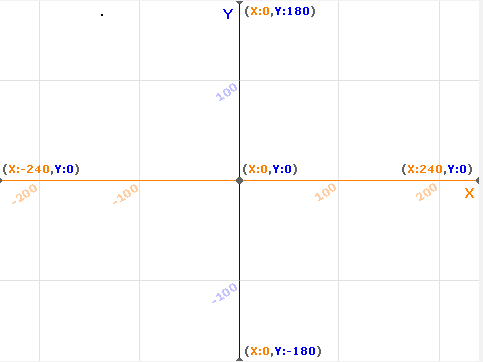
This image is a backdrop that is already created in Scratch (XY-grid), and that you can add to your project.
Add this program to your cat.

What does this program do?
Solution
This program moves the object to the lower right area of the screen when the b key is pressed.
Finally, save the file as programs.sb3
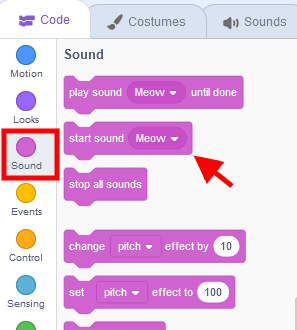
Sound, Music and Pen
Sound
Sound blocks are used to play sounds at some point in our program. Each sprite comes with a default sound. But we can record or add sounds that we already have on our computer:

Music
In addition to sound blocks, Scratch also has a set of blocks to add music to our programs
Where are the music blocks?
We have to add a new extension

A new window pops up and you can find different sets of blocks you can add. Pen block is also an interesting extension we will see in the next point.

Add the Music extension to your software.
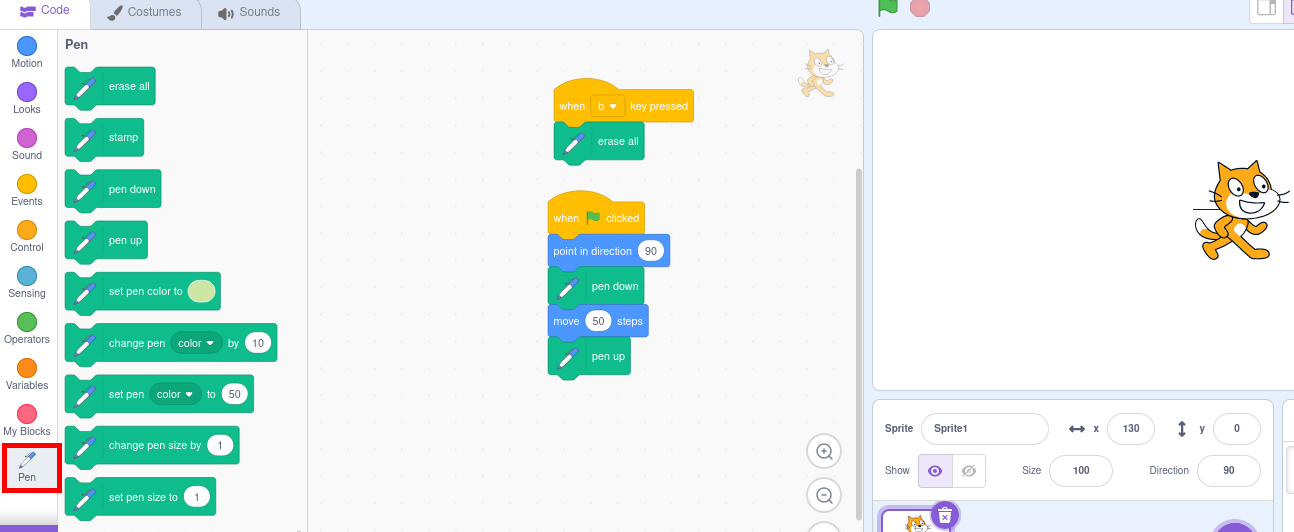
Pen
The Pen blocks are used to leave a trail for the sprite to move through. To use them you will have to add the extension as it has been explained in the Music section.
Add the Pen extension to your software.
To leave the trail drawn, it is necessary to add the "pen down" block prior to the movement. When we finish painting, we will have to put the "pen up" block so that when we move the sprite again it will no longer paint.
It is possible to paint with different colors and thicknesses. The "erase all" block is used to erase everything painted. We can put a Program that when pressing the "b" key deletes everything.
You can try placing these blocks to see their effect:
Practical case
Make a program that shows the path the cat has moved. Add a "meow" sound after you've painted the line.
Solution
Save the program with the name soundpen.sb3
Control: loops
Practical case:
To better understand what repetitions are, we are goint to make a program that draws two dashed lines.
Solution:
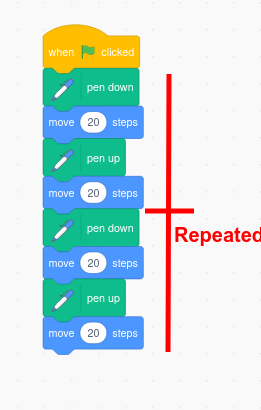
You can duplicate the blocks (right click - duplicate) so you don't have to build the same thing twice.
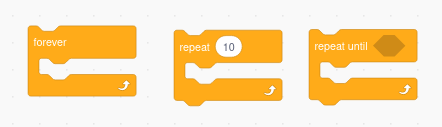
What if you had to paint many lines? That is, repeat the same thing many times. Then you can add a control block to do repetitions. Repetitions are also called "loops." It is possible to add 3 types of loops:
- They repeat themselves constantly, forever.
- They are repeated a specific number of times
- They repeat until a condition is met
Practical case
Create a program with a sprite that draws 10 dashed lines in a row.
Solution

Practical case
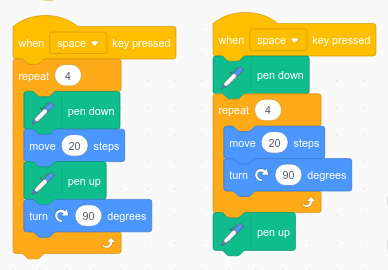
Add a new program, when the space key is clicked to draw a square
Solution
There are two possible solutions to drawing the square using the block of repetitions. Below are the two possible programs.. The pencil up and down blocks can be inside or outside the repetition block. In this example the result will be the same, although the one on the left is more efficient for code purposes since it does not execute the pencil down and up instructions unnecessarily.
Practical case
Make the cat change costumes constantly. Add a 1 second delay to make the costume change a bit slower.
Solution

Finally, save the program with the name loops.sb3
Control: conditions and sensors
Conditions are a type of blocks that evaluate something, and if it is true, then the blocks nested inside it are executed. They are available in the Control menu.
Open a new file.
Add these blocks and test them by clicking on the flag.
The green blocks are in the operators menu. The purple blocks in the Looks menu.
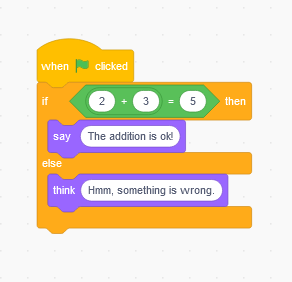
In these blocks it is verified that 2+3=5, and since it is true, then the cat says "The addition is ok". If you change the 5 to any other value, for example 6, the condition 2+3=6 is false, and the cat says "Hmmm, something is wrong."
Try the program changing the values to get right or wrong answers. Then delete it.
Practical case
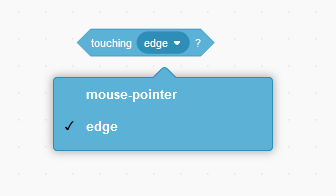
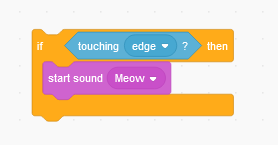
Let's create a program that will make the cat meow when it touches the edge of the stage. To do this, in the Sensing menu, we will use the Touching? block.
We will need the sound menu too.
Solution
First we have to create the blocks that check if we are touching the edge, and then meow:
A possible solution in the previous exercise for adding the edge touch check is to add it right after moving the cat in all directions. The option duplicate is perfect for this.

Save the program with the name conditions1.sb3
Sensing blocks allow to add more interactivity with the user, with the block ask and wait.
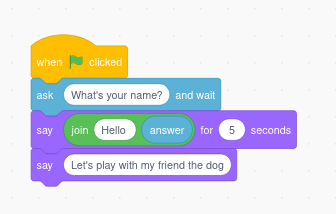
Practical case
Create a new program that asks you your name, and then greet you saying "Hello" and your name, and then invite you to play with the dog.
Solution
We will use a system variable available in Sensing blocks called answer that stores the answer received, and the operator block to concatenate words in a text message.
 Save this program with the name conditions2.sb3
Messages
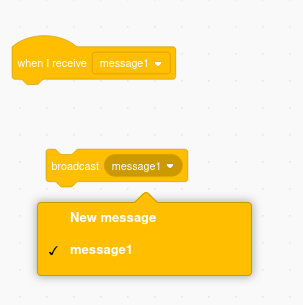
We can communicate two programs either within the same sprite or between different sprites or with the stage by sending messages. A message can be sent from a program from one sprite to another, to perform some action on it. These blocks are located in "Events".
Practical case:
Open a new file and include two sprites: one cat and one dog.
Add programs to the cat so that you can move it with the keyboard. (see motion section)
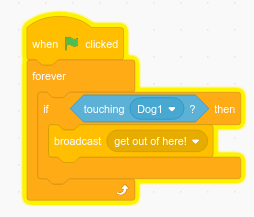
We are going to make it so that when the cat touches the dog, the cat program broadcasts a message to the dog program. When the dog receives the message, it will change its position, to a random position.
Solution
When Flag clicked, if the Cat touches the dog (Dog1), it sends a message.
Program to include in Cat code:
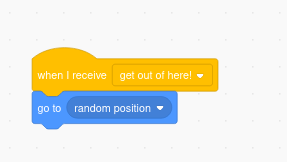
That message is received by the Dog1 sprite, and makes the dog move to a random position on the screen.
Program to include in Dog1 code:
Save it with the name messages.sb3
Variables
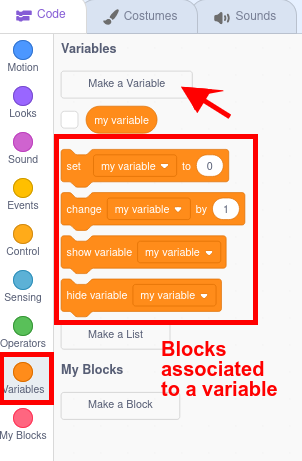
We can understand variables as a "name" that contains a "value." We can assign a value to the variable. And we can recover the value of the variable. When you make a new variable, these variable control blocks appear in "Variables".
Practical case:
Open a new file.
Make a new variable and call it "SCORE"
Solution

Variables as you have seen can be created to be recognizable and usable for all sprites (global), or only for a certain sprite (local). The first case is the usual, although in cases such as counter variables it may not be necessary for them to be global if they are only going to be used by a single sprite.
Let's add some more complexity.
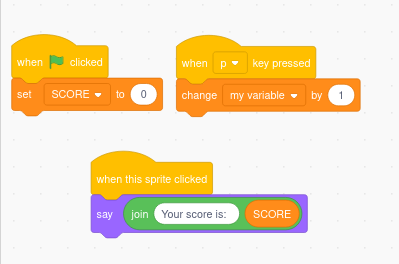
- Make the SCORE value set to 0 when you start the game. You can put this program on the stage or on any of the sprites you have defined.
- Make pressing the "p" key increase the POINTS value by 1. It can go on any sprite or the stage.
- Make the cat say the SCORE value when you click on the Cat. This program has to go in the Cat sprite.
Solution
Save the file with the name variables.sb3
Your first game
Practical case: Let's create our first game!
With all this we can create a simple game.
- At the beginning of the game, just the cat appears on a Stage of your choice, asks your name, greets you and invites you to play.
- Next the dog appears.
- We will move the cat with the arrows of the keyboard. As the cat moves, it changes of costume simulating it walks.
- When the cat touches the dog, the dog moves to a random place and barks and the program ends.
- Add any other feature of Scratch you feel interesting.
Save it with the name 1stgame_pcXX.sb3