Basic elements in programming
Output
Normally we program because we want to obtain a result. This result is what we usually call OUTPUT of the program, although everything that the program shows to the user receives the same name.
When you are taking your first steps in programming, you usually start by creating the Hello World program, which is a program that displays that message on the screen. This simple program will help us become familiar with the outputs. Let's see how to do it step by step:
Program: Hello world
Statement:
Create a program that shows on the screen the message "Hello world!"
Steps 1 and 2: Analysis and flowchart of the Hello world program
According to what was seen in the first section, it would have the following elements:
- Start and end terminals of the algorithm.
- A single output that would display that message.
FLOWCHART:

Steps 3, 4 y 5: Coding, compilation and checking of the Hello world program with Scratch
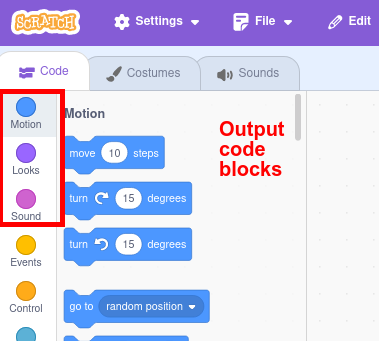
The code blocks associated with the outputs are:
- Motion: produce movement in the selected sprite.
- Looks: produce some change in the appearance of the selected sprite.
- Sound: produce some sound associated with the selected sprite.
Specifically, for our program we are interested in a couple of Looks blocks:
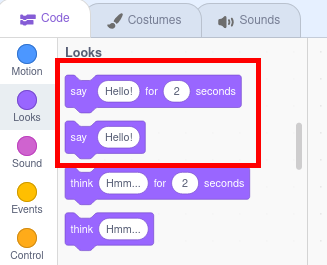
These blocks will show the sprite saying a message, in the first case for a certain time, in the second indefinitely.
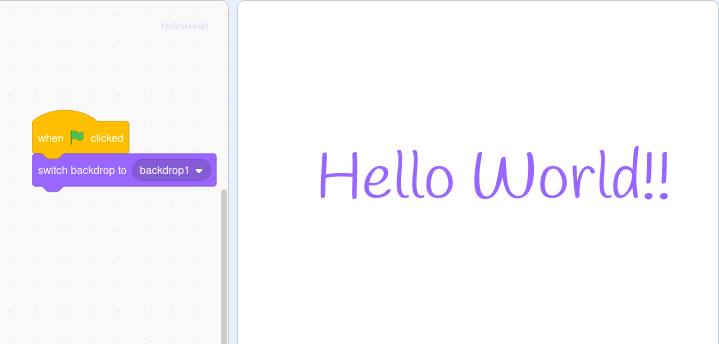
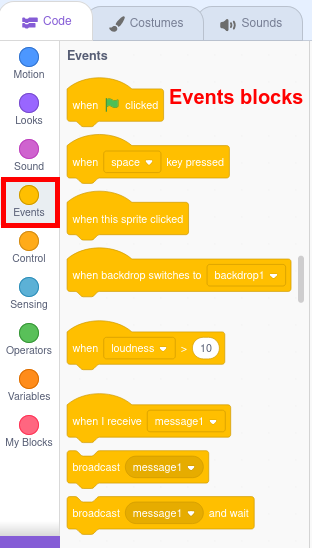
Finally we will have to mark the beginning and end of the program. In Scratch, the start is marked by clicking on the green flag at the top of the program window, and that order is found in the Events block. The ending is not specified.

When you click on the green flag, the sprite to which we have assigned the code will come out saying that message.

Save the program with the name spritehello.sb3
In this case we have associated the OUTPUT to a sprite. In the same way we could have associated it with the stage.
We have first to create a new backdrop with this message, using the Editor, and then change the backdrop to this, in the Looks block.
Save the program with the name stagehello.sb3
Input
A program like the example of the Hello World is not typical in programming. Increasingly, we seek to create programs that carry out actions that are not merely pre-programmed and automated, but rather react based on parameters provided by the user. All data that is provided to the program externally for subsequent processing is what we call INPUTS.
Inputs can be supplied in two ways:
- Manually: they are requested from the user and they enter them, normally via mouse or keyboard.
- In an automated way: through sensors that provide information about the environment. Of course with PSeInt we can't do this, but with Scratch we can.
To better understand the concept of Input, we will create a variant of the Hello World program that we will call Transmitting your message in which the program will request from the user the message they want to transmit, and then display it on the screen. Let's go step by step:
Program: Transmitting your message
Statement:
Create a program that requests from the user a message and then shows it on the screen.
Steps 1 and 2: Analysis and flow chart of the Transmitting your message program
Let's first look at the necessary elements in this program and its flowchart:
- Start and end
- Output: A first output is needed asking for the content of the message and a second showing it.
- Input: the content of the message.
- Storage: In this program a new concept appears, which is that of a variable, that is, a "container" that stores the data it receives from the input, for later processing.
The flowchart is:

Steps 3, 4 y 5: Coding, compilation and checking of the Transmitting your message program with Scratch
In Scratch, part of the blocks related to data input into the program are found in the SENSING menu (light blue) We also provide inputs with the EVENTS menu (yellow), with blocks to indicate what external action will determine whether the program is executed one way or another.
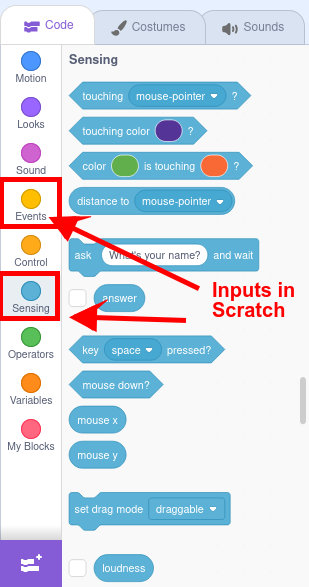
SENSING includes both blocks to ask and receive direct answers from users, as well as other types of input related to touching something (other objects, colors), being at a certain distance, reaching a sound volume, finding oneself in a certain area of the canvas, pressing a key or the mouse, etc...
If we want to program something similar to the previous program we would have to use the following blocks:

Scratch stores what is entered by keyboard in a predefined variable called answer, available in the same sensing menu. Variables and other data storage structures are the objective of the next point.
Save the file with the name message.sb3
Storage
In order to operate with the data, we must previously reserve memory spaces in which to store it. These are what we call data storage structures.
These structures must be defined by:
- Identifier: name that we give to the data during the program to refer to it.
- Type: nature and range of values that can be stored (number, text, boolean...)
- Value: specific content of the data at that moment.
In this course we are going to learn about only two structures, variables and vectors (also called arrays or lists in Scratch), although we are only going to focus in depth on the first one.
Variables and constants
They are spaces that store a single DATA of a different nature, and to which a name that identifies it is associated. The type of data they can store are:
- Numeric: they can be integers (int) or real (float), depending on whether or not they accept decimals, generally with Anglo-Saxon notation where the decimal is marked with a dot.
- Characters (char): letters or typographic signs. They are defined by enclosing the character with a single quote.
- Character strings (string): words or phrases. They are defined by enclosing the text with double quotes.
- Logical (Boolean): Supports values of TRUE or FALSE.
Variables, as their name indicates, are data structures that will take different values throughout the execution of the program, while constants adopt the same value throughout the program (For example, the PI number, or the percentage of the VAT).
It is very important to properly select the name of the variables and constants so that they help understand the stored data. Generally, constants are defined with names in uppercase and variables in lowercase.
To learn more about how it works, we are going to create the following program. We will call it SALES CALCULATOR.
Program: Sales calculator
Statement:
Create a program that requests from the user a price and an offer percentage. Later, based on a VAT percentage (Constant), the program shows a message with the total price to pay, VAT included.
Steps 1 and 2: Analysis and flow chart of the Sales calculator program
The elements involved will be:
- Start and end of program.
- Outputs: Request original price and discount percentage, and show the final price.
- Inputs: Original price, discount percentage
- Storage: original price (real number because it can be decimal), discount percentage (integer number because we will use the value as a percentage), final price (real number), VAT percentage (constant), and optionally the message to display (constant)
- Processing: addition, multiplication and division.
The flowchart is:
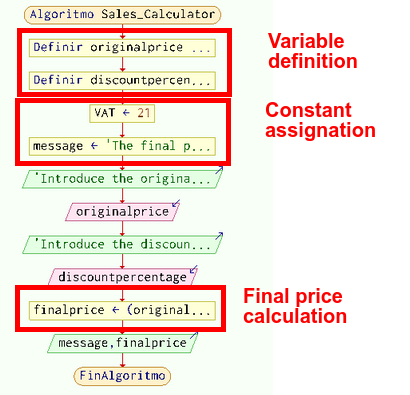
Variables could also be assigned initial values, although they will be modified throughout the program. If this is not done, 0 or empty is assumed as the initial value.
Steps 3, 4 y 5: Coding, compilation and checking of the Sales Calculator program with Scratch
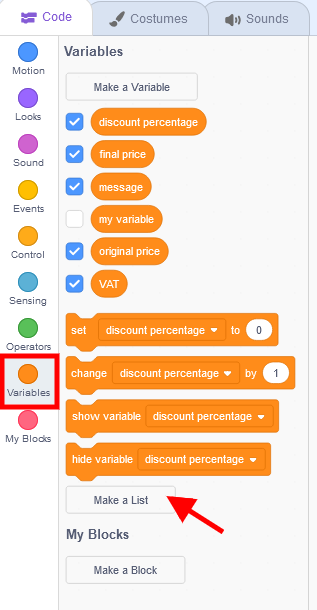
In Scratch, data storage structures are located in the Variables block. From there we can create as many variables as we need, and also assign them the desired value using the corresponding block.
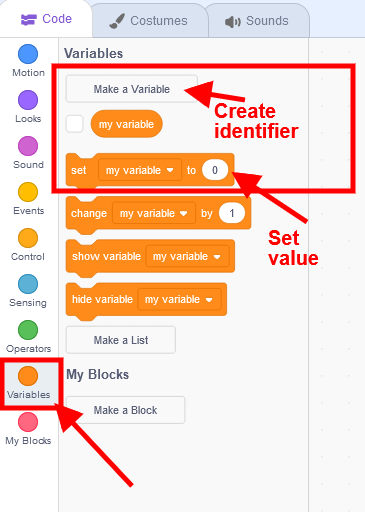
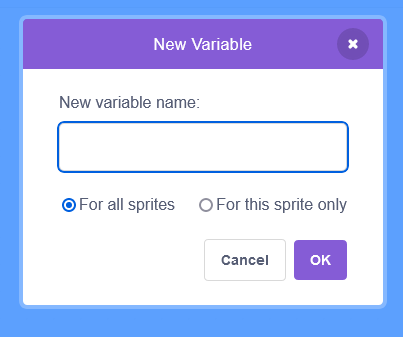
When creating a variable, the first thing it asks us for, apart from its identifier, is to know if it is defined as local (only for this sprite) or as global (common for all sprites). In this course we only develop programs for the same object, so it doesn´t matter.
Once the necessary variables have been defined, we will go on to create the code in the object using sensing, looks and the arithmetic and concatenation operators that we need, and which we will see in more detail in the next section. The code in blocks would look like this:
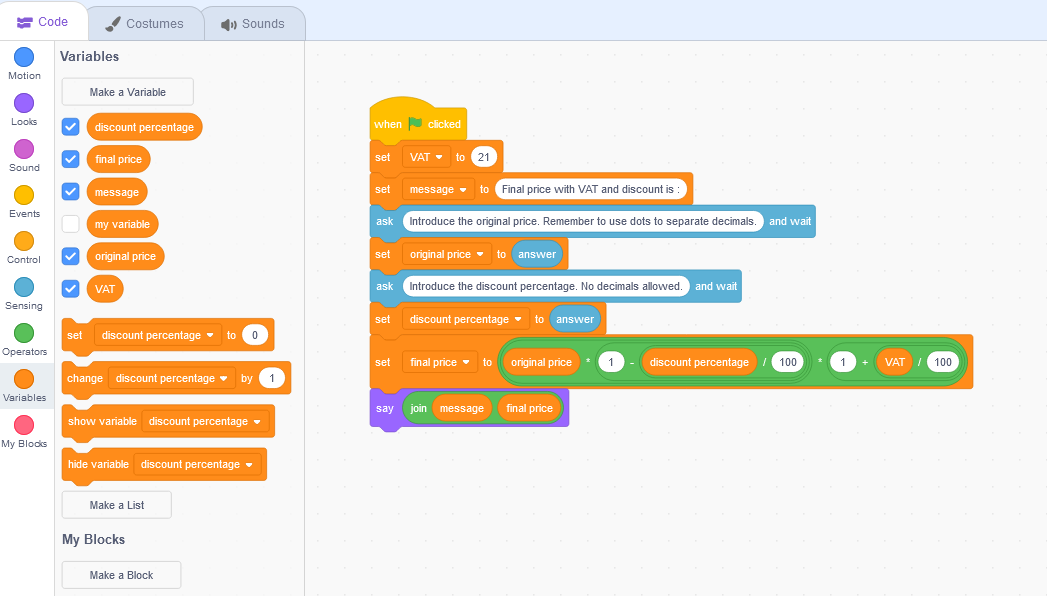
Save the file with the name salescalculator.sb3.
Complex data storage structures
Although it is not the subject of this course, in programming data sets can be stored as long as they are of the same type in other types of complex structures, the so-called arrays, which in Spanish are translated as vectors or matrices, and in PSeInt they are called dimensions.
Scratch only contemplates the use of lists that would be ordered series of data of the same type, and that are available within the same Variables block.
Processing
Types of operations
The operations to be performed with the data can be:
- Arithmetic: classic operations of addition, subtraction, multiplication and division or maths operations.
- Logics: comparisons, negation, AND, OR.
- Concatenation: union of several elements (strings of characters or variables of different types)
- Loops: Involves performing actions repeatedly. In this case it will be convenient to distinguish two types:
- Previously known number of times to repeat the action: we will use the For or Repeat structures.
- Number of times to repeat depending on values obtained: we will use the structures While (While...do) or Repeat until (Do...while), depending on whether we want to evaluate the condition before or after the first iteration. We will see that these structures are conditional as well as repetitive.
- Conditional: implies carrying out some actions or others by making decisions. Structures If-then (If-else), and Switch.
We have already seen the first three types of operations in the previous examples. We will now focus on the last two, although we will introduce various operations in the examples to delve into their use.
Iterations and loops
To practice with these structures, we will create a simple program that will calculate the average of several numbers (marks, for example). In this case, since the number of iterations is known, we will use the FOR/REPEAT statement. Likewise, we will use arithmetic and concatenation operators.
Program: Average of n marks
Statement:
Create a program to calculate the average of several numbers . First, the program requests the number of marks to average, then it asks that the marks be entered as many times as we have told it (here is the repetition). At the end, it shows the average.
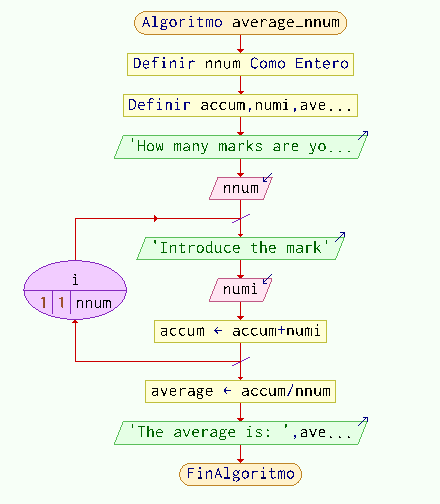
Steps 1 and 2: Analysis and flow chart of the Average of n marks program
The elements involved are:
- Start and end of algorithm.
- Outputs: Request number of marks, show average.
- Inputs: number of marks and marks to be averaged.
- Storage: number of elements (integer), entered numbers (real number), cumulative sum of numbers (real number), and average (real number)
- Processing: loop, concatenation, addition and division.
The flowchart associated with the FOR/REPEAT instruction is as follows:
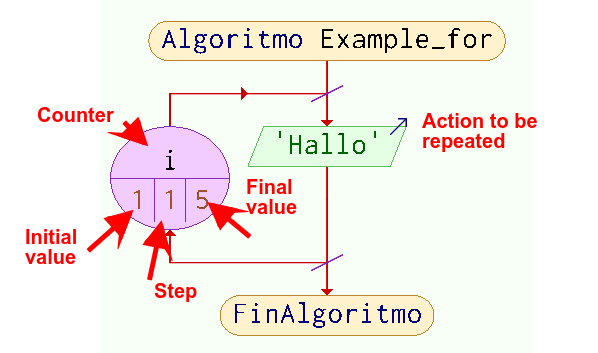
Flowchart:
Steps 3, 4 y 5: Coding, compilation and checking of the Average of n marks program with Scratch
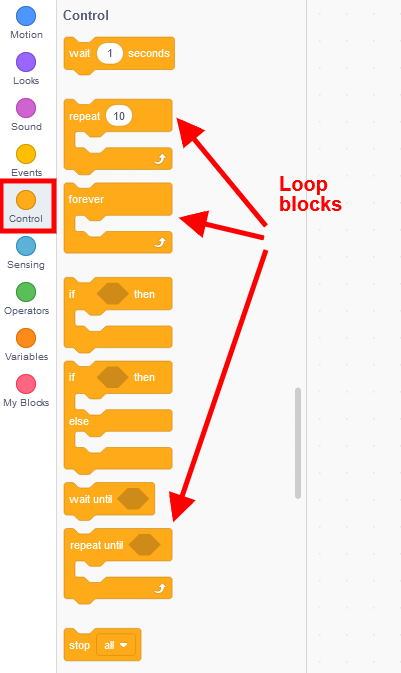
In Scratch the blocks related to repetitive structures are found in Control and are Forever, Repeat and Repeat until.
In our cas, as the number of iterations is defined, we will use repeat.
First of all, in the Variables block we will define the necessary variables.

In an analogous way, using the Sensing, Looks, and Variables blocks explained in the Inputs, Outputs and Storage sections, we build the program. In Operators we will find the blocks necessary to carry out arithmetic, logical and concatenation operations.

The final program with all the elements would look like this:
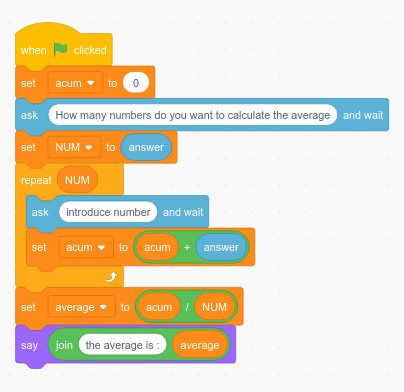
Save the program with the name averagenmarks.sb3
Be careful with setting the initial value at the beginning of your variables, as it happens in the example with accum.
Conditionals
To practice with these structures, we will carry out a simple program in which
Program: Report
Statement:
Create a program that requests a numerical grade, verifies if the value received is correct (between 0 and 10) and finally tells us whether the grade corresponds to a PASS or a FAIL.
Steps 1 and 2: Analysis and flowchart of the Report program
Involved elements are:
- Start and end of algorithm.
- Outputs: Request numerical mark, show pass or fail or error message.
- Inputs: numerical mark
- Storage: numerical mark (real number, may be decimal)
- Processing: logical (comparison, AND, OR) and conditional
Flowchart:

In this case we have defined the error condition using the logical operator OR, indicating that any mark less than zero or greater than 10 is considered erroneous. This program can be solved in an analogous way using the operator AND, indicating that it considers any numerical mark valid greater than or equal to zero and less than or equal to 10.
Steps 3, 4 y 5: Coding, compilation and checking of the Report program with Scratch
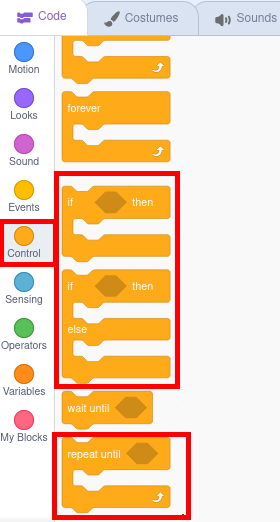
In Scratch the blocks related to conditional structures are found in Control, next to the loops.
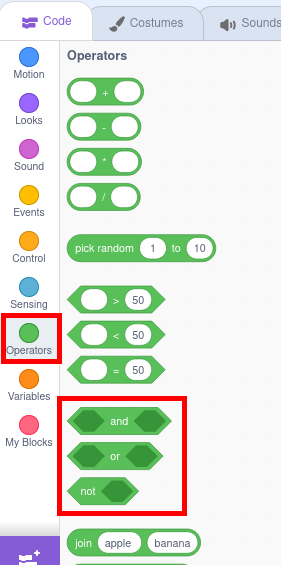
The logical operators AND and OR are found in Operators, along with the comparison operators and those already seen previously: arithmetic, concatenation...
As in all programs, we will start by defining the necessary variables, in our case only one from the Variables blocks.
Next we will request the rating using the block available in Sensing and we will store its response in the newly created variable.
Finally, we will evaluate the response obtained through the corresponding Control block and using the logical operators of Operators, depending on their value, we will offer the error message or write the final grade with the corresponding Looks block.
The resulting code would be the following:
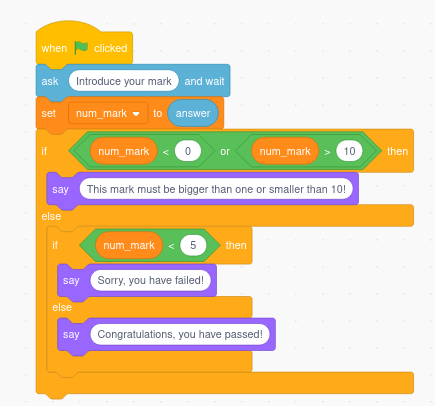
In this case we use the OR operator because Scratch does not have the combined operators less than or equal and greater than or equal, and thus we save ourselves from having to combine both operators with a logical operator OR. Remember the KISS principle.
Finally, we verify the correct functioning of the program and its robustness against the most common errors. In Scratch we execute by clicking on the green flag.

Save the file with the name report.sb3
Comments
A comment in programming is text in our source code that the compiler ignores. And if it is ignored, why do we put it on? Usually to give us internal explanations of what the function of each part of the program is. They are also very useful for temporarily discarding code fragments, without having to delete them, and thus facilitate their later recovery.
Comments in programming are essential:
- They facilitate understanding: not only of other users but also of the programmer himself throughout the duration of the development of the program.
- They encourage collaboration: they make the code understandable for other co-programmers who can also participate.
- They facilitate error debugging: commenting and uncommenting code fragments will allow us to detect where errors are occurring.
Comments in Scratch
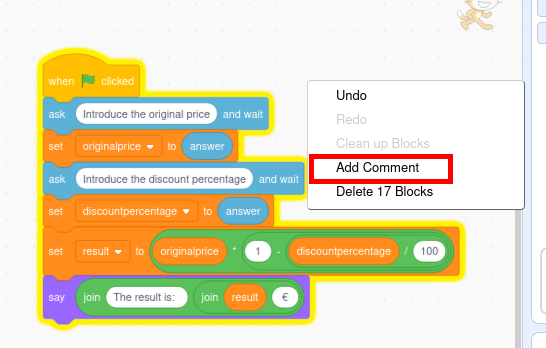
In Scratch you can add comments from the code editing window associated with each object. Comments can be either associated with a block or on the editing window itself. They are added by right-clicking on the place where we want to insert the comment.
Once added, they remain as visible notes in the code editing area.

Of course in Scratch there is no option to comment and uncomment blocks so that they are not taken into account by the compiler. The option available to do this is to separate the event that determines the execution of that block and the code will be temporarily deactivated.

Modify any of your previous files by adding several explanatory comments.
Rename and save it with the name comments.sb3